Wwise Unity Setup for Magic Leap 2
Introduction
This guide walks through the steps to integrate Wwise into a Magic Leap 2 Unity project on a Windows machine.
Validated with:
- Unity Engine : 2022.2.0f1
- Wwise SDK : 2022.1.4.8202
Instructions assume default settings unless otherwise specified, typically to avoid errors or for simple convenience. Your project settings and configuration may vary depending on the needs of your project.
Please note that these instructions have only been confirmed to work on Windows and are not guaranteed to work on MacOS or Linux.
Installing Wwise and Wwise SDK
Download and install the Audiokinetic Launcher located here: Audiokinetic | Download Wwise
Open the Audiokinetic Launcher and select the Wwise tab to choose a version to install
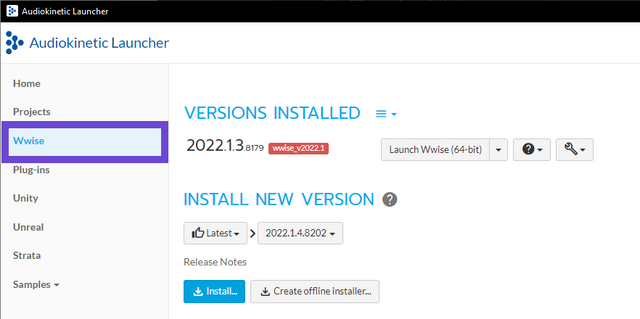
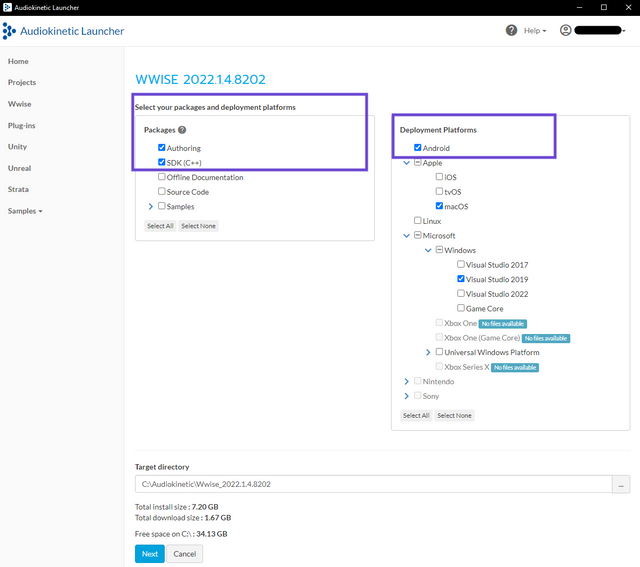
- Select the SDK (C++) option as well as Android as a Deployment Platform for Magic Leap 2 deployment. This will ensure you can build the necessary x86_64 integration and have available x86_64 versions of any DSP plugins to copy into your project in a later step.
The Target directory specified in this step will also set the environment variable for both WWISEROOT and WWISESDK. If you intend to build the Wwise Unity integration manually as outlined in a later step, it is recommended to change the default value to a path without any white space as shown below. If you do not intend to build the Wwise Unity integration, you can use the default Target directory.
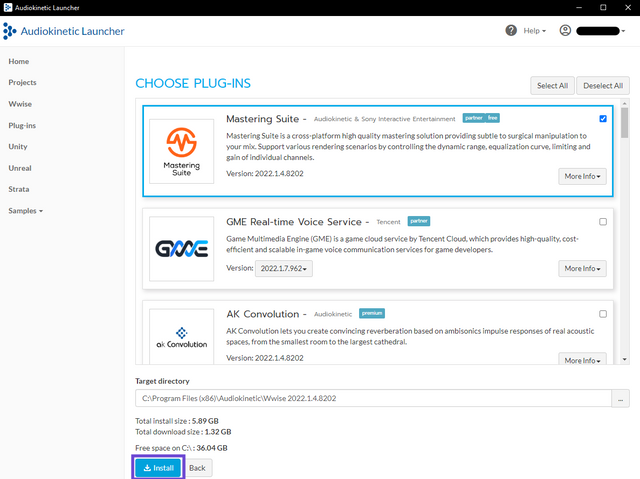
- On the Choose Plug-ins page, select any plugins you want to include and select Install.
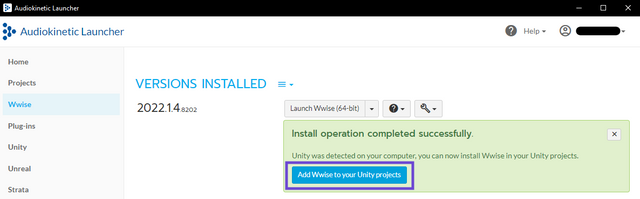
- When the installation is complete, you can add Wwise to your Unity projects.
Adding Wwise to a ML2 Unity Project
This document assumes you have already set up a Unity project for Magic Leap 2. Shown below is a test project with no Wwise integration.

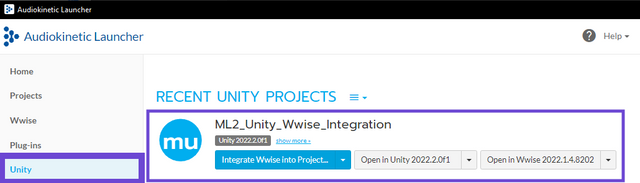
- In the Audiokinetic Launcher, navigate to the Unity tab. The Unity project should be shown under Recent Unity Projects. Select "Integrate Wwise into Project".
x
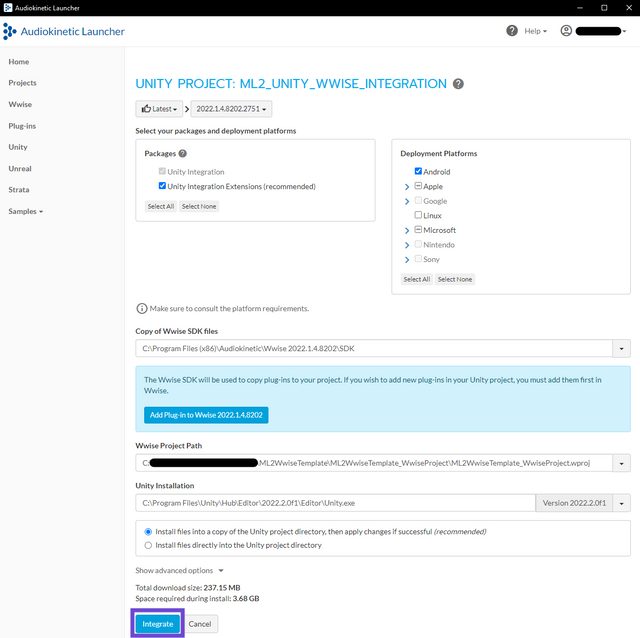
- Be sure to select Android under Deployment Platforms and select Integrate and wait while it applies the changes to your Unity project.
You may get a message that not all selected deployment platforms are installed. If this happens, the "Integrate" button will not be enabled. Select the option to modify the Wwise installation to include any required components.
Building Wwise Plugin for Android x86_64
At the time of writing this document, Audiokinetic's Wwise/Unity integration does not include the necessary Android x86_64 integration needed to deploy on Magic Leap 2 hardware. This means that it is required to manually build the integration and copy the compiled integration plugin into your project. Not doing so will result in Wwise failing to load when deployed on Magic Leap 2. This method has been tested internally by Magic Leap, but is not officially supported by AudioKinetic.
The official AudioKinetic documentation for building the Unity Wwise integration from source can be found here, including documentation for all prerequisites : Build the Native Integration Plug-in from Source
Modifying BuildModule.py
After integrating Wwise into your Unity project, there should be several .zip files inside the root folder of your Unity project, one of which titled WwiseUnityIntegration_Android_Src.zip.
- Unpack WwiseUnityIntegration_Android_Src.zip
- In the extracted directory, open Wwise/AkSoundEngine/Android/BuildModule.py in any text editor.
- Find the line that defines BuildUtil.SupportedArches['Android']
- Add x86_64 as shown below:
BuildUtil.SupportedArches['Android'] = ['armeabi-v7a', 'arm64-v8a', 'x86', 'x86_64']
Building Wwise Unity Integration for Android x86_64
To build the integration, simply run the BuildWwiseUnityIntegration.py script found in Wwise/AkSoundEngine/Common/BuildWwiseUnityIntegration.py in the package that was unzipped in the previous step. The following is recommended steps for this process:
Open a command prompt window
Navigate to the unpacked directory in the command prompt window
Run the following command to build the integration for Android x86_64
python BuildWwiseUnityIntegration.py -p Android -a x86_64If the build is successful you should see Build Succeeded and a list of successful builds including Android x86_64 for Profile, Debug, and Release variants.
Wwise: CRITICAL: BuildWwiseUnityIntegration.py (WwiseUnityBuilder): 311: List of Succeeded Builds: Android(x86_64, Debug), Android(x86_64, Profile), Android(x86_64, Release)
If this does not succeed, double check your Environment Variables are set properly (ANDROID_HOME and NDKROOT for the Android SDK and NDK, as well as python) and follow any errors you might encounter appropriately.
The final files can be found in the Wwise/AkSoundEngine/Android/out directory. Dig down for each type (Profile, Debug, and Release) until you find libAkSoundEngine.so under the x86_64 directories for each.
The output paths for each are:
- Debug:
- Wwise/AkSoundEngine/Android/out/Debug/local/x86_64/libAkSoundEngine.so
- Profile:
- Wwise/AkSoundEngine/Android/out/Profile/local/x86_64/libAkSoundEngine.so
- Release:
- Wwise/AkSoundEngine/Android/out/Release/local/x86_64/libAkSoundEngine.so
Copy x86_64 Wwise Unity Integration Into the Unity Project
All that's left to do is copy the compiled plugins into the expected locations in the Unity project's Wwise directory that was created during the initial Wwise integration step.
- Ensure that Unity is closed before adding these plugins.
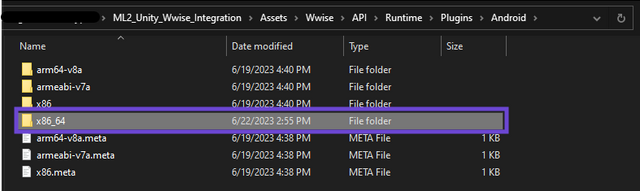
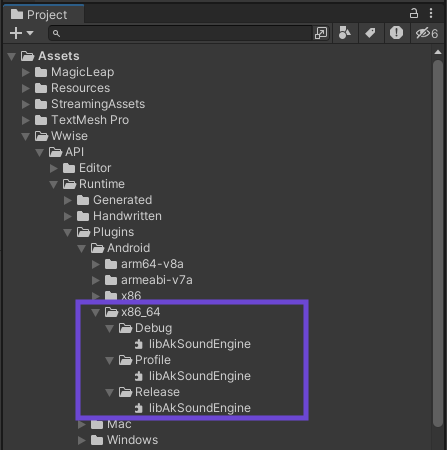
- Create a new directory in Assets/Wwise/API/Runtime/Plugins/Android/
- Name the directory x86_64
- You should also see directories for arm64-v8a, armeabi-v7a, and x86
Inside of this x86_64 directory, create three new directories titled Debug, Profile, and Release
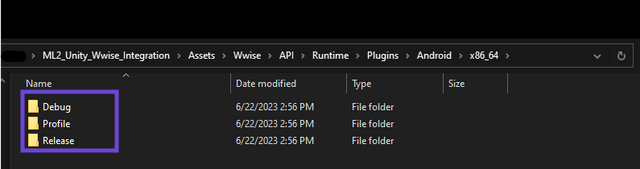
Copy the libAkSoundEngine.so versions that were built in the previous step into these respective directories, being sure to match each to their corresponding directory location.
Open your Unity project. Unity will detect these directories and plugins, import them, and generate the .meta files and verify that the folder structure looks as it does below.
Copy x86_64 Wwise DSP Plugins Into the Unity Project
The above steps only build and integrate the Wwise AkSoundEngine plugin but not any of the DSP plugins you may need. Luckily, if you installed the Wwise SDK, you already have these files and simply need to import them into your Unity project.
- Ensure that Unity is closed before adding these plugins.
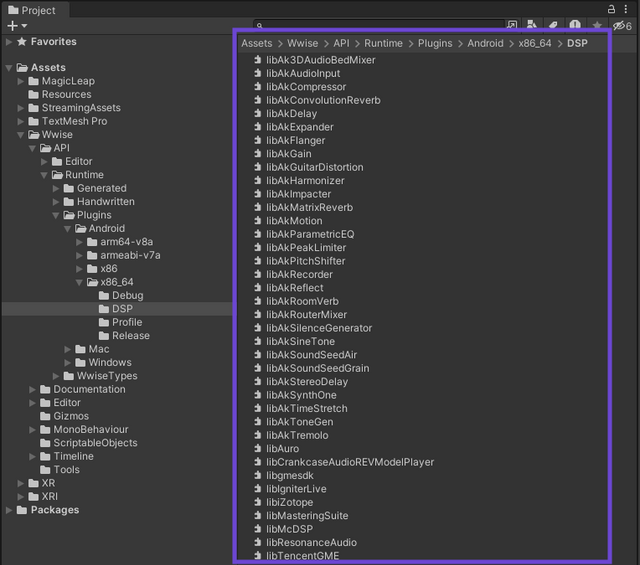
- Create a new directory in Assets/Wwise/API/Runtime/Plugins/Android/x86_64
- Name the directory DSP
- Copy the Profile version of the plugins from your Wwise SDK directory located wherever Target directory was set during the initial Wwise installation.
- [SDK PATH]/Android_x86_64/Profile/bin/
- Paste the plugins into the new x86_64/DSP directory in your Unity project and open Unity.
Not all plugins found in the Wwise SDK for Android_x86_64 have been fully tested on Magic Leap 2.
![File browser showing plugin files in the "[SDK PATH]/Android_x86_64/Profile/bin/" directory](/assets/ideal-img/k.dfa7d79.640.png)
Unity should import the new plugins and they should be found in the Assets folder as shown below:
Testing the Integration
Wwise Project Configuration
The following steps outline creating a simple looping Play event in Wwise from a blank project and building SoundBanks with default settings for testing basic functionality. Your specific project setup or needs may differ.
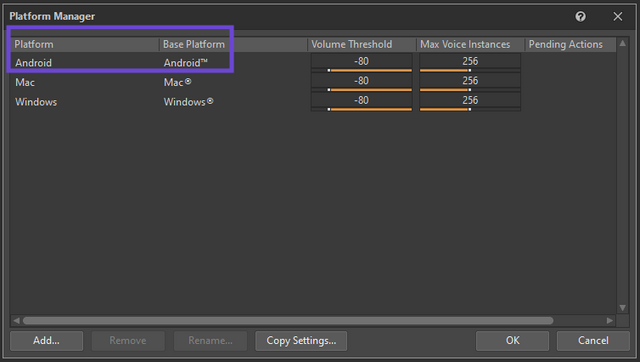
- Open the Wwise project (found inside your root Unity project folder) and ensure that Android is available as a Platform under the Platform Manager window.
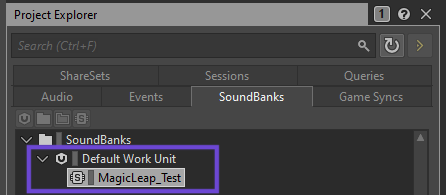
- Create at least one SoundBank to load with your test scene.
- Import a test sound.
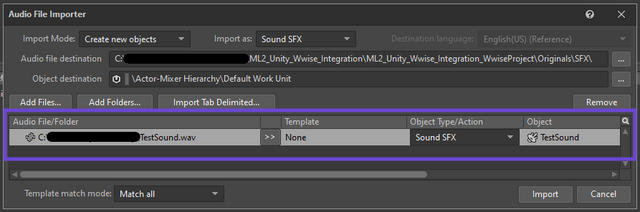
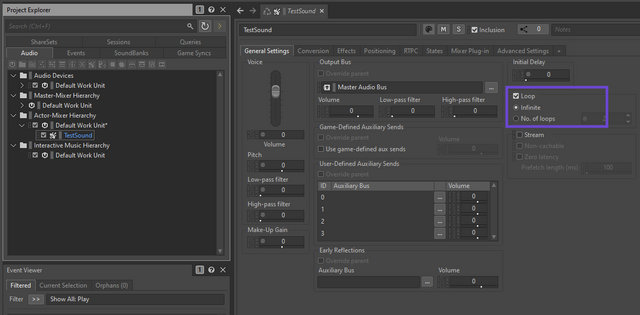
- Set the sound to Loop so it's easy to test when launching the scene on Magic Leap 2.
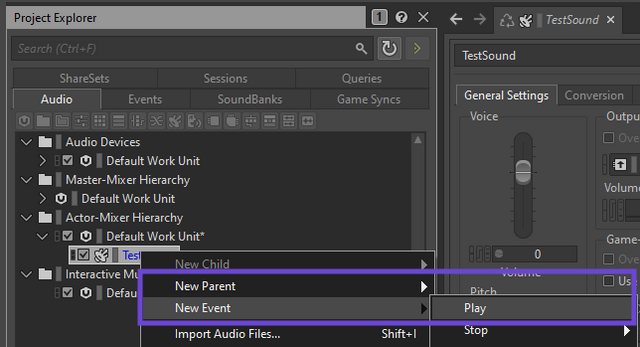
- Create a basic Play event from the Sound SFX.
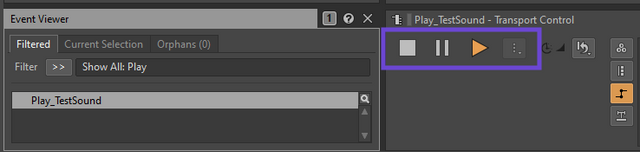
- Using the Transport Control, test the event by pressing Play, you should hear the sound looping.
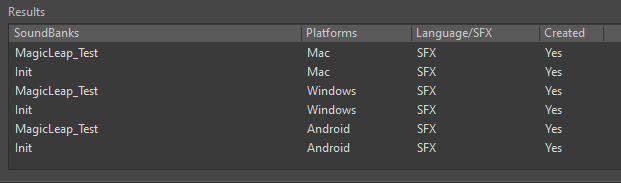
- Ensure that the SoundBank is selected to be generated, and select Generate All to generate SoundBanks.

- If there are no errors, you should see that the soundbanks have been created for all Platforms.
Unity Project Configuration
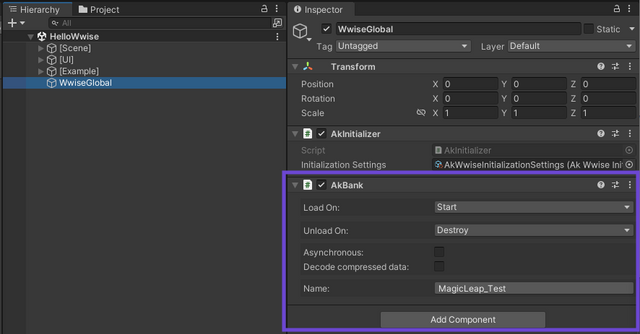
Add an AkBank object to WwiseGlobal and select the bank created earlier to load on Start.
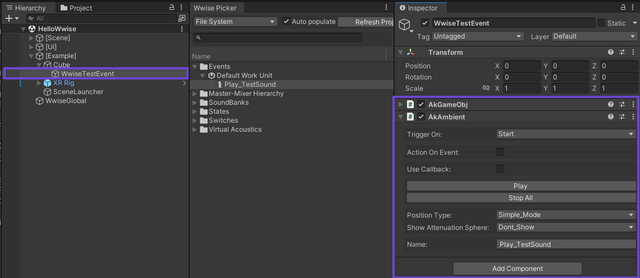
In the Wwise Picker window, simply drag the Play event onto an object (in this example, an empty object that is the child of a Cube primitive). The necessary components will be added automatically, and the event will already be listed in the Name field.
Press Play in Unity and you should hear the sound.
Building for Magic Leap 2
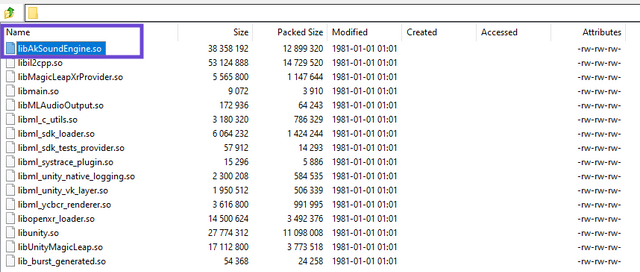
At this point, you can build normally. You can validate that everything has been packaged properly by looking at the apk and looking for two things:
- libAkSoundEngine.so is included in the lib directory
- If this is not found, Wwise will not be able to load at runtime.
- The Android SoundBanks are located in the assets\Audio\GeneratedSoundBanks directory.
- If this is not found, banks will not be able to load at runtime.

Install and launch the apk. You should now hear the looping sound playing. You have successfully verified that Wwise works in your project when deployed to Magic Leap 2!
Common issues
- libAkSoundEngine.so is not included in the build.
- Make sure the generated plugins are copied into the expected path in Assets:
- Assets/Wwise/API/Runtime/Plugins/Android/x86_64/[Variant]/libAkSoundEngine.so
- In Unity, activate the plugin version you want to deploy under Assets > Wwise > Activate Plugins > [Variant]
- Check the plugin settings
- Make sure the generated plugins are copied into the expected path in Assets:
- Android SoundBanks are not included in the build.
- It's possible that during the build process, when Wwise/Unity attempts to copy the Android SoundBanks folder for packaging, there may already exist a read-only Android folder in the Unity project. This can be avoided by either setting the Android folder to writable, or simply deleting it before building.
- SoundBanks for all platforms are included in the build.
- You may have copied all platform SoundBanks into the Unity Streaming Assets folder. Depending on your configuration, Unity may attempt to package everything, creating multiple copies of all of your audio assets, potentially greatly increasing your build size.
- Any additional issues you may encounter regarding Wwise Integration or Unity troubleshooting are beyond the scope of this document.