Ready Player Me for Magic Leap 2
This guide will walk you through how to implement the Ready Player Me VR half-body avatars inside your Unity project for Magic Leap 2.
In this guide you will:
You can use the sample scene to test the project for yourself by swapping out the "Avatar - REPLACE ME" child of the XR Rig in the ML2ReadyPlayerMeDemo scene or follow the guide below to set up your scene from scratch using the scripts provided in the sample.
This project has been confirmed to work with Unity 2022.2.20, Magic Leap 2 Unity SDK 1.8.0, Ready Player Me Avatar Loader 1.3.2 and Ready Player Me Core 1.3.1.
Please check the Magic Leap 2 version compatibility matrix to see the latest available versions of the Magic Leap 2 Unity SDK and check for updates in the Ready Player Me documentation if you run into avatar import issues.
Prerequisites
Before you begin, you must:
- Download the Magic Leap 2 Ready Player Me package
- Create a Ready Player Me VR half-body avatar
- Complete Eye Calibration for accurate eye tracking on your Magic Leap 2 device
Setting up your project
Copy the link to your Ready Player Me VR avatar.
Complete Step 1 of the Ready Player Me Unity Quickstart guide to add the Ready Player Me package into your project. You may need to restart the project for the package to take effect.
After restarting your project, in the Unity menu go to Ready Player Me > Avatar Loader. Paste the glb file URL of the VR avatar you created earlier into the Avatar URL slot. Keeping all the other checkboxes checked, click Load Avatar Into Current Scene.
Delete the Main Camera object in the scene hierarchy.
In Packages > Magic Leap SDK > Runtime > Tools > Prefabs find the XR Rig prefab and drag it into your scene.
Expand the XR Rig and enable the Right Hand Controller and Left Hand Controller objects.
Import the Magic Leap 2 Ready Player Me package into your scene by navigating to Assets > Import Package > Custom Package and selecting the MagicLeapReadyPlayerMe.unitypackage file. Select All and click Import.
Head to Edit > Project Settings > Magic Leap > Permissions and enable RECORD_AUDIO, EYE_TRACKING, VOICE_INPUT, EYE_CAMERA and HAND_TRACKING.
Save the scene.
Configuring your Avatar in the scene
- Rename the imported Ready Player Me avatar object in your scene to something like “Avatar” and make it a child of the Main Camera object inside the XR Rig prefab.
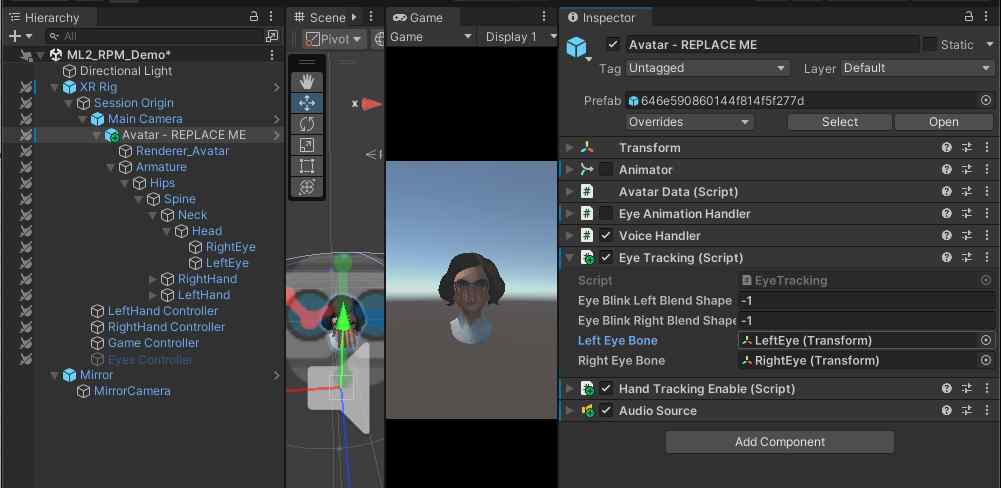
- Select the Avatar object and in the inspector window and disable the Eye Animation Handler.
- With the Avatar object selected, click “Add Component” and add an Audio Source.
- Drag the newly created audio source into the “Audio Source” field in the Voice Handler script on the Avatar.
- Add the EyeTracking and HandTrackingEnable scripts from MagicLeapReadyPlayerMe package to your Avatar object.
- Save the scene.
Configuring Eye Tracking in your avatar
Expand the Avatar object until you find the RightEye and LeftEye children of the Armature (located under Armature>Hips>Spine>Neck>Head).
With the Avatar object selected, drag and drop the RightEye child of the Armature into the Right Eye Bone field and the LeftEye child into the Left Eye Bone field of the Eye Tracking script on the Avatar.
Configuring Hand Tracking in your avatar
In your scene hierarchy, expand the XR Rig prefab and make sure the LeftHand Controller and RightHand Controller objects are enabled.
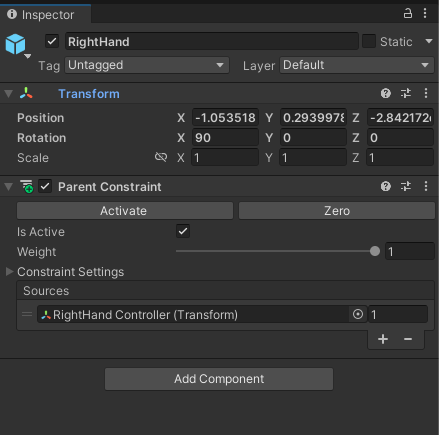
Expand the Avatar object and select the RightHand child of the Armature.
With the RightHand object selected, go to the Inspector window and click Add Component > Parent Constraint.
Hit the “+” icon to add a new constraint. Drag and drop the RightHand Controller from the XR Rig into the source.
Click Zero in the parent constraint settings to activate the constraint
Uncheck "Is active".
Set the RightHand’s position to 0,0,0 and rotation to 90,0,0.
Save the scene. This step is necessary to ensure the transform offset isn't modified.
After saving, click Activate on the parent constraint to activate the parent constraint. Now the hand models will track to the hand controllers without offset.
Select the LeftHand child of the armature and repeat steps 3, 4 and 5, this time adding the LeftHand Controller as the source of the parent constraint on the LeftHand.
Save the scene.
This will make the hands of the Ready Player Me avatar move along with the detected hands. Play around with the scale and offset to make them match the size of your hands. If you would like to only see the hand models you can disable the Line Renderers on the RighHand Controller and LeftHand Controller objects.
Testing
- To see yourself using the avatar, drag and drop the Mirror prefab from the RPM Assets folder into the scene and position it at (0,0.5,1.6) to place the canvas where it was launched.
- If you run into issues with the material on the Mirror showing up as pink, make sure its shader is set to Universal Render Pipeline - Unlit and drag the Camera Texture from the RPM Assets folder into the Base Map field of the RenderMat material used by the Mirror plane.