XR Origin and ML Rig
This section provides information on how to create a Player Rig that is compatible with Magic Leap 2 and is driven by the user's head and controller movement controller. This can be done by either:
- Using Unity's Standard XR Origin (AR).
- Importing the ML Rig & OpenXR Input Sample and using the ML Rig.
Prerequisites
XR Origin (AR)
Developers can use the default Unity XR Origin. This section includes instructions on using the standard AR Origin to track the user's head pose and controller.
- Create the rig by selecting GameObject > XR > XR Origin (AR) from the main menu.
- Modify the camera offset values on the XR Origin component and/or the Camera Offset Transform’s Y value according to your application's needs. You can also set the origin's Tracking Origin Mode to modify your application's origin.
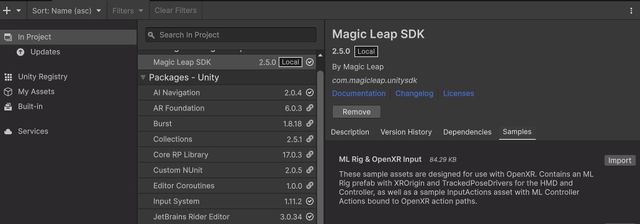
Magic Leap Rig & OpenXR Inputs Samples
The Magic Leap 2 Unity SDK still provides sample assets that a developer can use to quickly get started. To emphasize that these are merely examples rather than requirements, the following are now provided in the SDK package as a sample bundle named ML Rig & OpenXR Input:
ML Rig - A prefab containing an XR Origin with an offset of 0, with headpose tracking and a Controller object pre-configured to OpenXR action bindings. You can configure the XR Origin's Tracking Origin Mode to modify your application's origin.
MagicLeapOpenXRInput - An
inputactionsasset with Action Maps for HMD (head tracking), Controller, and Eyes. The device paths for Controller and Eyes require enabling the Magic Leap 2 Controller Interaction Profile and Eye Gaze Interaction Profile respectively.
Importing the Samples
- Opening Unity Package Manager
- Navigate to Window > Package Manager in Unity. This will open the Package Manager window.
- Selecting the Package
- In the Package Manager, select the Magic Leap SDK package from the list.
- Importing Samples
- In the package details, locate the Samples section which lists available samples.
- Click on the Import button next to the ML Rig & OpenXR Input sample.
- Confirming Import
- If prompted, confirm the import action by clicking Import.
- Unity will import the selected sample into your project. This may take a moment.
- Accessing Imported Samples
- Locate Magic Leap Rig and Input assets inside your project's
/Assets/Samples/MagicLeapSDK/<Version>/directory. - Replace the Main Camera with the ML Rig from the samples folder.
- Locate Magic Leap Rig and Input assets inside your project's
Input Handling
The Magic Leap 2 Unity SDK uses Unity’s Input System. The Input System is highly configurable and offers various ways to configure user input in your Unity project.
While earlier SDK versions included a MagicLeapOpenXRInput.inputactions asset, it's now considered deprecated for OpenXR development. It's recommended to set up input according to your project's specific needs.
Refer to input-specific guides in the OpenXR section of the Magic Leap 2 documentation for more information: