Unity Mixed Reality Template
The Unity Mixed Reality Template allows developers to start their projects configured for multi-platform mixed reality development. This guide will walk you through updating the Mixed Reality Template project to work with the Magic Leap 2's Unity OpenXR SDK.
Prerequisites
Before you begin, ensure you have the following installed:
- Unity Hub
- Unity Editor (2022.3 LTS or higher)
- Magic Leap Unity SDK ( v2.1.0 or higher)
For detailed installation instructions, refer to the Installation Guide.
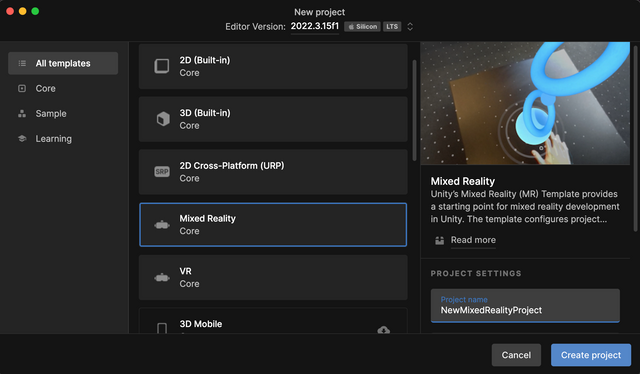
Create a Mixed Reality Project
Start by creating a new project in Unity using the Mixed Reality Template.
- Open Unity Hub.
- Click New.
- From the Editor Version dropdown, select a compatible Unity Editor (2022.3 LTS or higher).
- Select the Mixed Reality template from the list.
- Provide a project name and location.
- Click Create.
Add ML Unity SDK and Configure Project Settings
Complete the steps in the Quickstart Guide to import the Magic Leap SDK and configure the project for use with Magic Leap 2.
Configure Permissions
To use features such as Plane Detection and Hand Tracking, you need to declare the appropriate permissions this can be done inside the application’s manifest.xml file or through the Magic Leap Permissions window. In this guide we will enable the permission through the Magic Leap Permissions editor window.
- Navigate to Edit > Project Settings > Magic Leap > Permissions.
- Enable the following permissions:
EYE_TRACKINGHAND_TRACKINGSPATIAL_MAPPING
Remove Meta-Specific Packages and Feature Groups
The Mixed Reality template is configured by default for the Meta Quest platform. To prevent conflicts, follow these steps to remove Meta-specific packages:
- Go to Project Settings > XR Plug-in Management > OpenXR
- Under Enabled Interaction Profiles, remove the following interaction profiles:
- Meta Quest Touch Pro Controller Profile
- Oculus Touch Controller Profile
- Add the following Magic Leap-specific Interaction Profiles:
- Hand Interaction Profile
- Eye Gaze Interaction Profile
- Magic Leap Controller Interaction Profile.

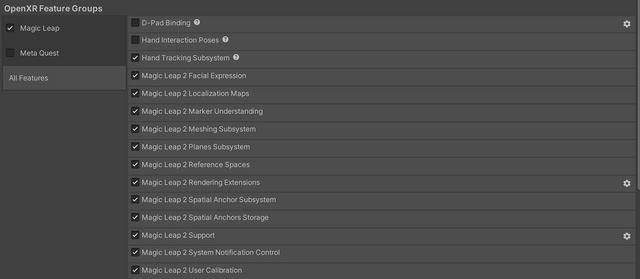
- Ensure that only the following Magic Leap feature groups are enabled under OpenXR Feature Groups:
- Hand Tracking Subsystem
- Magic Leap 2 Planes Subsystem
- Magic Leap 2 Reference Spaces
- Magic Leap 2 Rendering Extensions
- Optional: Disable Segmented Dimming by clicking the ⚙ (settings) icon next to the feature and setting the Blend Mode to Additive.
- Magic Leap 2 Support
- Palm Pose
- Optional: In the Package Manager (Window > Package Manager), locate and remove the Unity Meta OpenXR package by clicking the remove button.
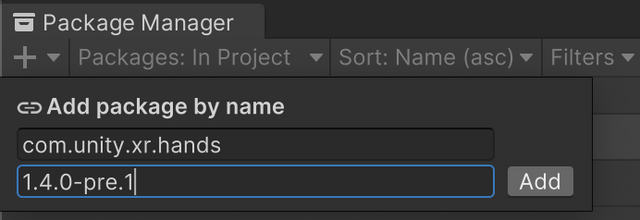
Update the XR Hands package
Update the Unity XR Hands Package to ensure compatibility with Magic Leap 2 (version 2.1.0 or higher).
- Go to Window > Package Manager and remove the existing XR Hands package by clicking Remove next to the package name.
- Click the + (plus) icon in the upper left corner of the Package Manager and select Add Package By Name. Then specify the following:
Name: com.unity.xr.hands
Version: 1.4.0-pre.1
Modify the Default XR Input Actions
The default XRI Input Actions target the Meta Hand Interaction Profile. To use the Magic Leap 2 compatible Hand Interaction profile instead, follow these steps:
- Download the preconfigured Magic Leap XRI Default Input Actions.
- Replace the existing
XRIDefaultInputActionsasset in theAssets/Samples/XR Interaction Toolkit/<Version>/Starter Assetsdirectory.
For manual configuration options, refer to the XR Hands Guide.
Enable Magic Leap Plane Detection and Eye Gaze
Due to the sensitive nature of Eye Tracking and Spatial Mapping, these features require applications to request permissions at runtime. Once granted, you can initialize the Magic Leap Plane Subsystem to detect surfaces. Use the following script to integrate these features into your Unity project:
- Create a new C# script and name it
ML2PlaneManager.cs - Paste the following code into the script, ensuring you replace any placeholder comments with appropriate functionality:
using System.Collections;
using MagicLeap.Android;
using UnityEngine;
using UnityEngine.XR.ARFoundation;
using UnityEngine.XR.ARSubsystems;
using UnityEngine.XR.MagicLeap;
using UnityEngine.XR.Management;
using UnityEngine.XR.OpenXR.Features.MagicLeapSupport;

// This class manages plane detection and eye gaze integration for Magic Leap devices.
public class ML2PlaneManager : MonoBehaviour
{
    private bool _mappingPermissionGranted;
    private ARPlaneManager _planeManager;

    // Called before the first frame update
    IEnumerator Start()
    {
        // Attempt to find an ARPlaneManager in the scene.
        _planeManager = FindObjectOfType<ARPlaneManager>(true);
        if (_planeManager == null)
        {
            Debug.LogError("Failed to find ARPlaneManager in scene. Disabling script.");
            this.enabled = false;
            yield break;  // Exit if no ARPlaneManager is found.
        }

        // Initially disable the PlaneManager until permissions are verified.
        _planeManager.enabled = false;

        // Wait until necessary subsystems are loaded.
        yield return new WaitUntil(AreSubsystemsLoaded);

        // Request permissions for spatial mapping and eye tracking.
        Permissions.RequestPermissions(
            new string[] { MLPermission.SpatialMapping, MLPermission.EyeTracking },
            OnPermissionGranted,
            OnPermissionDenied,
            OnPermissionDenied
        );

        // Wait for mapping permissions to be granted.
        yield return new WaitUntil(() => _mappingPermissionGranted);

        // Start querying for planes.
        QueryMLPlanes();
    }

    // Callback when a permission is granted.
    private void OnPermissionGranted(string permission)
    {
        if (permission == MLPermission.SpatialMapping)
        {
            _planeManager.enabled = true;  // Enable plane detection.
            _mappingPermissionGranted = true;
        }
    }

    // Handles querying for planes using Magic Leap subsystem specifics.
    private void QueryMLPlanes()
    {
        var query = new MLXrPlaneSubsystem.PlanesQuery
        {
            Flags = _planeManager.requestedDetectionMode.ToMLXrQueryFlags() | MLXrPlaneSubsystem.MLPlanesQueryFlags.SemanticAll,
            BoundsCenter = Camera.main.transform.position,
            BoundsRotation = Camera.main.transform.rotation,
            BoundsExtents = Vector3.one * 20f,
            MaxResults = 100,
            MinPlaneArea = 0.04f
        };

        MLXrPlaneSubsystem.Query = query;
    }

    // Check if the necessary XR subsystems are loaded.
    private bool AreSubsystemsLoaded()
    {
        return XRGeneralSettings.Instance?.Manager?.activeLoader?.GetLoadedSubsystem<XRPlaneSubsystem>() != null;
    }

    // Callback when a permission is denied.
    private void OnPermissionDenied(string permission)
    {
        Debug.LogError($"Permission {permission} was denied.");
        _planeManager.enabled = false;  // Disable plane detection as a fallback.
    }
}
- In your Unity scene, create a new empty GameObject and name it
MLPlanes - Attach the
ML2PlaneManager.csscript to theMLPlanesGameObject
Edit XR Origin
This section outlines how to set the application's origin so that it initializes at the device's position when the app is first launched:
- In the Unity Editor, open the
SampleScenefrom the Mixed Reality Template project. - Expand the
MRInteractionSetuphierarchy and select theXROriginGameObject. - In the Inspector, from the XR Origin script and set the Tracking Origin Mode to Device. This will make content appear relative to the headset's height when the application starts.
Build and Deploy
Follow these steps to build and deploy the application:
- Power on the device and connect it to the computer.
- Open the Build Settings by navigating to File > Build Settings.
- Click Build And Run, then select a location and name for the application (.apk)
For troubleshooting, refer to the detailed configuration instructions in the Configure Project Settings guide.