Configure Project Settings
This section provides detailed steps on how to manually configure your Unity Project so that you can build and deploy OpenXR applications for Magic Leap 2.
Prerequisites
- Download Magic Leap Unity SDK
- Unity project using Editor version 2022.3 LTS or higher
This section provides detailed steps on how to manually configure your Unity Project so that you can build and deploy applications for Magic Leap 2.
Quickstart
The fastest recommended way to set up your project for Magic Leap 2 development is to use the latest version of the Magic Leap Setup Tool.
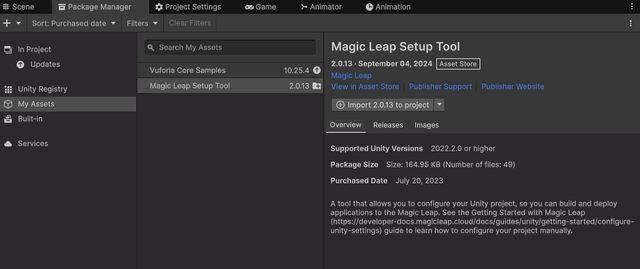
- Download the Magic Leap Setup Tool from the Unity Asset Store
- After adding it to your asset library, click the Open in Unity button to show the tool inside Unity's Package Manager.
- Select Download then Import to import the tool into your project.
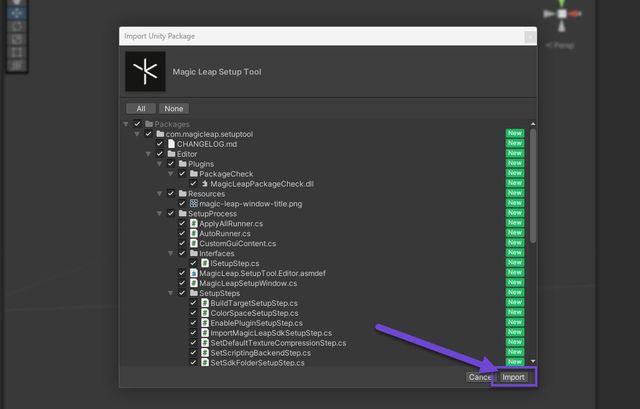
- Keep all of the package contents selected in the Import Unity Package window and select Import.
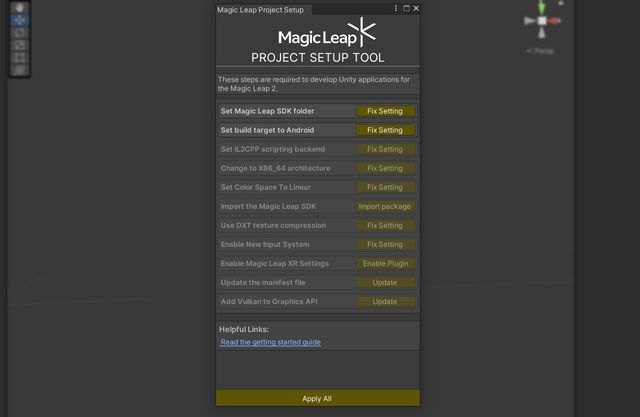
- After the package is imported, you should see the Magic Leap Project Setup Tool popup window. If you do not see it, go to Magic Leap > Project Setup Tool in the Unity menu.
In Unity 6, you need to ensure that your project's Application Entry Point is set to Activity only.
Go to Project Settings>Player>Other Settings>Application Entry Point.
Make sure that Activity is checked and GameActivity is unchecked
- The project setup tool will walk you through all of the steps necessary to complete setup. Start by setting the Magic Leap SDK by selecting Locate SDK. Then select the folder containing the latest version of the Magic Leap Unity SDK.
- After setting the SDK folder, you can select the Apply All button on the bottom of the window to quickly change all of the required settings.
- After accepting all prompts and restarting the editor, your project will now be ready for Magic Leap 2 development.
Manual Setup
Import Magic Leap Unity SDK
The Magic Leap SDK provides access to Magic Leap's perception and input API. The Magic Leap Unity SDK can be installed using the Unity Package Manager by importing the SDK from your computer or a scoped registry.
- From Tarball File
- Scoped Registry
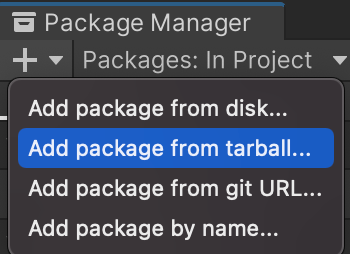
Open the Package Manager window ( Window > Package Manager).
Select the "+" (plus) button in the top-left corner, then Add package from tarball.
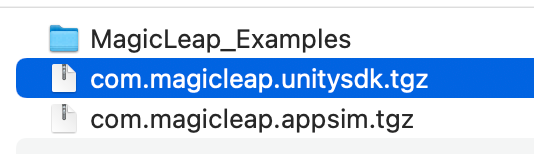
- Navigate to the location of the following folders and select the .tgz file within to add the package from
com.magicleap.unitysdk.tgz(downloaded via ML Hub). For example:
- Mac :
$HOME/MagicLeap/tools/unity/<Version>/com.magicleap.unitysdk.tgz - Windows :
%USERPROFILE%/MagicLeap/tools/unity/<Version>/com.magicleap.unitysdk.tgz
You may see the following pop-ups appear:
"This project is using the new input system package, but the native platform backends for the new input system are not enabled in the player settings. This means that no input from native devices will come through. Do you want to enable the backends? Doing so will RESTART the editor and will DISABLE the old UnityEngine.Input APIs."
- Select Yes
"This project may contain an obsolete method to validate interactions between XR Interactors and Interactables. This Update is only required for older projects updating the XR Interaction Toolkit package. If this package was newly installed, please cancel this operation. If you choose 'Go Ahead', Unity will update all Interactors and Interactables in Prefabs and scenes to use the new Interaction Layer instead of the Unity physics Layer. You can always manually run the XR InteractionLayerMask Updater fro... (For the full error message, see the editor log file located at ...)"
- Click I Made a Backup, Go Ahead!
- Navigate to to the Package Manager settings by selecting Edit > Project Settings from the menu. Then choose Package Manager.
- Select the + button at the bottom of the list. A new entry will appear as New Scoped Registry in the list.
- Enter the following details into the Scoped Registry:
Name : Magic Leap
URL : https://registry.npmjs.org
Scope : com.magicleap
- Click Apply.
Now you will be able to view Magic Leap packages in the Package Manager. Follow the steps below to download and import the Magic Leap Unity SDK.
- Open the Package Manger window (Window > Package Manager).
- Click the Packages dropdown and select My Registries.
- Find and select the Magic Leap SDK package from the list.
- Finally select Download and then Import.
You can also add the registry by editing your project's /Packages/manifest.json file directly
- Open the
manifest.jsonfile located in the/Packages/folder inside your project's root directory. - Add the following scoped registry
"scopedRegistries": [
    {
      "url": "https://registry.npmjs.org",
      "scopes": [
        "com.magicleap"
      ],
      "name": "Magic Leap"
    }
  ]
At any time, you can fix any problems with your registry by choosing Reset packages to defaults from the main Unity Help menu. However, be aware that this action resets all changes you made to the dependencies of your project so it is best to do this as a last resort.
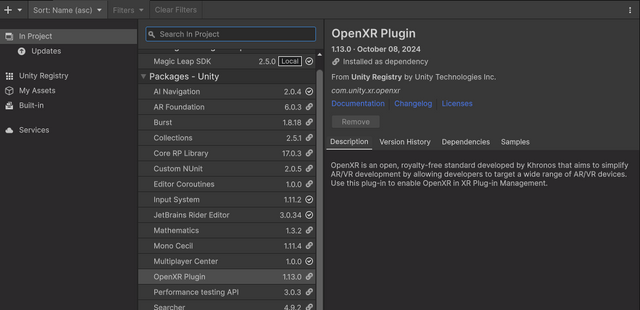
Verify OpenXR Unity Package Version
- Open the Package Manager (Window > Package Manager).
- Verify that your project contains OpenXR Plugin version 1.10.0 or greater.
- If the package is not present or an older version is installed. Select the OpenXR Plugin Package and click install.
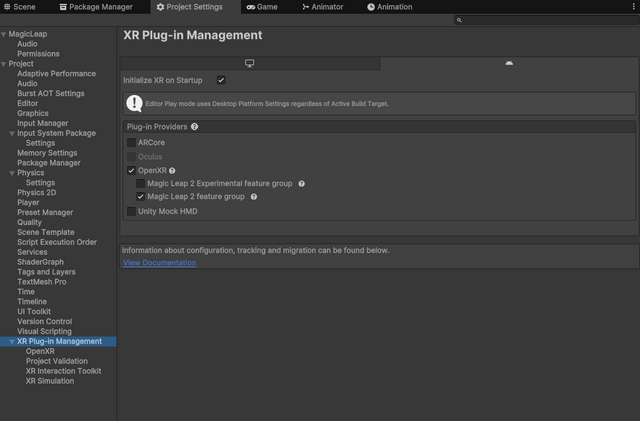
XR Plug-in Management
The Magic Leap OpenXR Feature Group needs to be enabled before when deploying to a Magic Leap 2 device. To do this:
- Go to Edit > Project Settings > XR Plug-in Management select the Android tab
- Enable the OpenXR provider enable Magic Leap feature group , this will add support for Magic Leap 2.
If converting an existing project which uses the Magic Leap XR provider, it is highly recommended that you disable the Magic Leap provider to avoid unpredictable behavior.*
Enable Magic Leap OpenXR Features
Once you have the Magic Leap 2 Unity SDK package installed, you will have access to a collection of OpenXR Features corresponding to supported vendor extensions, as well as the Magic Leap 2 Controller interaction profile.
- Under Edit > Project Settings > XR Plug-in Management, select OpenXR in the left sidebar.
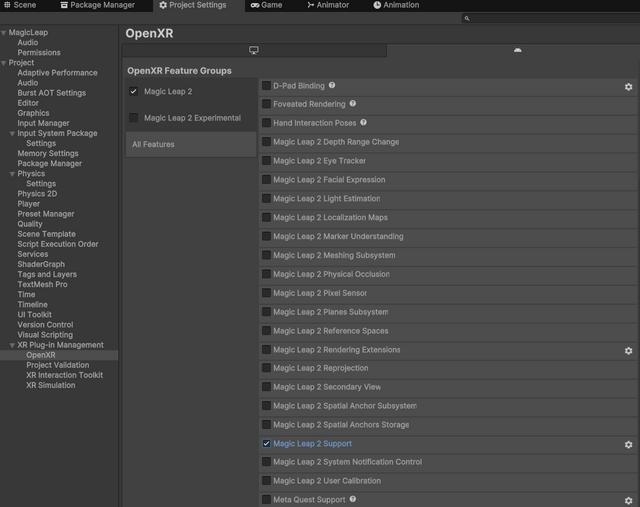
This window allows you to enable corresponding supported OpenXR Features and Interaction Profiles. Alternately, you can also toggle the Magic Leap Feature Group on the OpenXR Tab or on the XR Plug-in Management tab to switch on all Magic Leap 2 Features
Features which have additional settings that can be configured by selecting the ⚙(gear) icon to the right of the feature. Clicking this icon will open an additional window where the Feature’s options can be changed.
The Magic Leap 2 Support Feature MUST be enabled if your project contains the Magic Leap XR Plugin package. This is due to a graphics bug. At some time in the future, the Unity SDK will not install the ML XR Plugin as a dependency, but for now this is still the case.
Player Settings
Under the Edit > Project Settings > Player section, make sure the Android tab is selected, then configure the following settings:
- At the top, set the following identifiers:
- Company Name - the name of your company.
- Product Name - the name of your app or product as you want it to appear on the in-device menu.
- Navigate to the Other Settings section
- Set the Color Space property to Linear. This enables more realistic rendering. For more information, read Unity’s gamma and linear color space workflow guide.
- Disable Auto Graphics API and make sure the only Graphics API listed is Vulkan.
- (Recommended) Enable Multithreaded Rendering.
- Set the Texture Compression Format to either DXT + RGTC(BC4, BC5)(Recommended) or DXT.
- Set Normal Map Encoding to DXT5nm-style. This will ensure that normal maps display correctly on Magic Leap 2.
- Navigate to the Identification section
- Make sure the the Package Name is unique, otherwise it may conflict with an app already installed on your device.
- Set the Minimum API Level to 29.
- Locate the Configuration section
- Set the Scripting Backend to IL2CPP.
- Check the box next to the Target Architecture x86-64 (Chrome OS and Magic Leap 2) and set the Target Devices dropdown to All Devices.
Custom Manifest
This section provides instructions on how to create a custom manifest file and declare Magic Leap 2 specific permissions for your application. For more information, see the Permissions Overview guide.
Editing your application's permissions through the Unity Editor Window is only available if you have a valid MLSDK path assigned the Unity Editor's Preferences Window.
- Enable a custom manifest in your project's settings by going to Edit > Project Settings > Player, then under Publishing Settings select Custom Main Manifest.
- Go to Edit > Project Settings > Magic Leap > Permissions to enable permissions for various features.
Build Settings
Build Settings let you set the target platform, configure build-related settings, and start the build process.
- In the menu, go to File and select Build Settings.
- Under Platform, select Android.
- Click Switch Platform.
- You are now ready to add scenes to the build order and build to the device!
Validate Project Settings
Developers can use Unity's Project Validation tool to validate that project's settings have been configured properly.
- Open the OpenXR Project validation window (Window > XR > Open XR > Project Validation).
- Verify that no issues are listed. If there is an issue, select Fix All in the top right of the Project Validation window.
This tool can be used to configure new projects in the future. Note, the validation tool does not check your project's Manifest, API level, or XR Plugin Management settings.
Troubleshooting Magic Leap Hub Interaction
If you experiencing issues connecting and deploying a project to your device, it might be because the Unity Editor is using a version of ADB that conflicts with the one the Magic Leap Hub is using. The can cause device communication to terminate incorrectly. To fix this, you can set the Magic Leap Hub's ADB installation path to the one used by the Unity Editor.
- Open the Magic Leap Hub.
- Navigate to the Magic Leap Hub's Developer Settings by selecting Home > Settings > Magic Leap Hub > Developer
- Select the Use custom adb checkbox and set the path to the Android Tools used by Unity.
- To save the path you set, deselect the Use custom adb checkbox.
If you are unsure which SDK path is used by your Unity installation, you can view the Android SDK path used by the Unity Editor inside Unity's Preferences Window.
- In the Unity Editor, open your project. If you don't have a project created, you can view the Android SDK path by opening a new project.
- Select Edit > Preferences (macOS: Unity > Preferences).
- In the left navigation column, select External Tools. The Android section of the External Tools panel contains entries for JDK, SDK, NDK, Gradle.
- Copy the SDK path.
- In the Developer Setting page in the Magic Leap Hub, paste the copied path into the Use custom adb field. Note that the adb service is located in the SDK's
platform-toolsdirectory.
- Windows
- MacOS
C:\Program Files\Unity\Hub\Editor\[EditorVersion]\Editor\Data\PlaybackEngines\AndroidPlayer\SDK
/Applications/Unity/Hub/Editor/[EditorVersion]/Editor/Data/PlaybackEngines/AndroidPlayer/
Finally disable the Kill ADB server on exit option for your project, unless you specifically need this behavior. By default, the preference is active, which can cause disruptions when using the Magic Leap Simulator.
- Open the Unity Editor.
- Select Edit > Preferences (macOS: Unity > Preferences).
- In the left navigation column, select External Tools.
- Scroll down to the Kill ADB server on exit option and deselect the checkbox.