Simple Meshing Setup
In this tutorial, you'll learn how to set up the Spatial Mapping component with Magic Leap 2 in Unity. By the end of this guide, you'll have a scene capable of meshing the world around you, providing a foundation for immersive mixed reality experiences. The Spatial Mapping in Magic Leap 2 is similar to AR Foundation's Spatial Mapping component.
Prerequisites
Before you begin, ensure you have completed the following steps:
Part 1: Requesting Spatial Mapping Permissions
To access the Spatial Mapping feature, developers will need to enable and request the necessary SPATIAL_MAPPING permission.
Add Spatial Mapping Permission to Manifest:
- Go to Edit > Project settings > Magic Leap > Permissions and ensure SPATIAL_MAPPING is enabled.
Create a Permission Requester:
- Create a new empty GameObject named Mapping Permissions.
- Create a new script (Assets > Create > C# Script) named
SpatialMappingPermissionRequester.csand attach it to the Mapping Permissions. - Copy the script below into the
SpatialMappingPermissionRequester.cs. The script will request the required permissions at runtime, which is required because SPATIAL_MAPPING is a dangerous permission.
This script will request spatial mapping permission and enable or disable the meshing subsystem based on whether the user has allowed or denied the permission. You can learn more about requesting permissions in the Unity Requesting Permissions Guide.
using UnityEngine;
using UnityEngine.XR;
using UnityEngine.XR.MagicLeap;

// Requests the Spatial_Mapping permission and enables/disables the MeshingSubsystemComponent depending on the user's preference.
public class SpatialMappingPermissionRequester: MonoBehaviour
{
    // Serialized field to hold a reference to the Meshing Subsystem Component
    private MeshingSubsystemComponent meshingSubsystemComponent;
    // Instantiate a callback object to listen for permission events from Magic Leap
    private readonly MLPermissions.Callbacks mlPermissionsCallbacks = new MLPermissions.Callbacks();

    private void Awake()
    {
        // Subscribe to permission granted and denied events from Magic Leap
        // These subscriptions will invoke methods when permissions are granted or denied
        mlPermissionsCallbacks.OnPermissionGranted += MlPermissionsCallbacks_OnPermissionGranted;
        mlPermissionsCallbacks.OnPermissionDenied += MlPermissionsCallbacks_OnPermissionDenied;
        mlPermissionsCallbacks.OnPermissionDeniedAndDontAskAgain += MlPermissionsCallbacks_OnPermissionDenied;

        meshingSubsystemComponent = FindObjectOfType<MeshingSubsystemComponent>(true);
        if(meshingSubsystemComponent)
        {
            // Disable the Meshing Subsystem until permissions are granted
            meshingSubsystemComponent.enabled = false;
        }
    }

    void Start()
    {
        // Request Spatial Mapping permission from the user at the start of the scene
        // The mlPermissionsCallbacks object will handle the user's response
        MLPermissions.RequestPermission(MLPermission.SpatialMapping, mlPermissionsCallbacks);
    }

    // Method to handle the event when permission is denied
    // It disables the meshing subsystem to prevent access to spatial mapping features
    private void MlPermissionsCallbacks_OnPermissionDenied(string permission)
    {
        if(meshingSubsystemComponent)
        {
             meshingSubsystemComponent.enabled = false;
        }
    }

    // Method to handle the event when permission is granted
    // It enables the meshing subsystem to allow access to spatial mapping features
    private void MlPermissionsCallbacks_OnPermissionGranted(string permission)
    {
        if(meshingSubsystemComponent)
        {
            meshingSubsystemComponent.enabled = true;
        }
    }
}
Part 2: Setting Up the Meshing Subsystem Component
In this section, we'll establish the core meshing functionality by setting up the Meshing Subsystem. This component controls how the meshes are generated, updated, and displayed.
Create Meshing Subsystem GameObject:
- Create a new empty GameObject and name it Meshing Subsystem.
- Set its scale to
(10,10,10), this will define the meshing area to 10x10x10 meters.
Add Meshing Subsystem Component:
- With Meshing Subsystem selected in the hierarchy, click Add Component in the Inspector and add MeshingSubsystemComponent.
Create the Mesh Parent.
- Create an empty GameObject named Mesh Parent in the hierarchy and set its position to
(0,0,0). This object will hold all the meshes that get generated at runtime. - Drag and drop the Mesh Parent object into the
MeshParentproperty on the Meshing Subsystem Component. This object will hold all the meshes that get generated at runtime.
- Create an empty GameObject named Mesh Parent in the hierarchy and set its position to
Part 3: Creating a Rendered Mesh Prefab
Now, we will create a prefab named Rendered Mesh that will serve as a template for the mesh data generated by the Meshing Subsystem.
Create Rendered Mesh GameObject:
- Create a new empty GameObject named Rendered Mesh and set the position to
(0,0,0).
- Create a new empty GameObject named Rendered Mesh and set the position to
Configure Rendered Mesh Components:
- Add a Mesh Filter (Add Component > Mesh Filter) and a Mesh Renderer (Add Component > Mesh Renderer) to the Rendered Mesh.
- Create a new transparent unlit URP material named MeshMat and assign it to the object's
Mesh RendererMaterial slot. - Add a Mesh Collider (Add Component > Mesh Collider) to Rendered Mesh prefab and leave the
Meshset to None (The mesh will be generated at runtime by the meshing subsystem component).
Create Rendered Mesh Prefab:
- Drag the Rendered Mesh GameObject into your Assets folder to create a prefab.
- Delete the Rendered Mesh GameObject from the scene Hierarchy.
Target Rendered Mesh inside Meshing Subsystem Component:
- Select the Meshing Subsystem in the Hierarchy, and inside the Meshing Subsystem Component, drag the Rendered Mesh prefab from the Assets folder into the
MeshPrefabproperty.
- Select the Meshing Subsystem in the Hierarchy, and inside the Meshing Subsystem Component, drag the Rendered Mesh prefab from the Assets folder into the
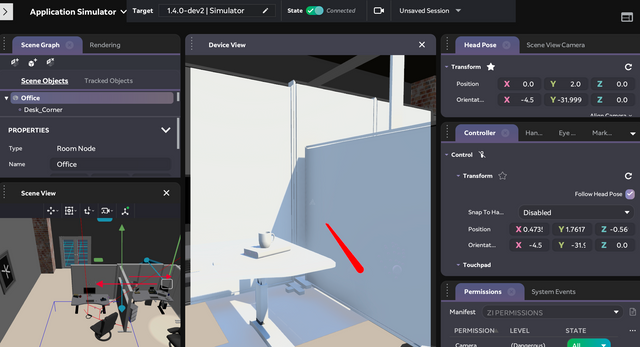
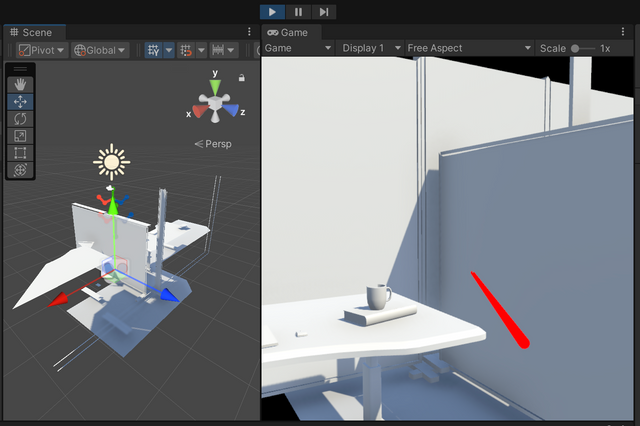
Testing in App Simulator
- Test the scene using Application Simulator in simulator mode. You should be able to see generated meshes from the room inside Application Simulator appear inside the Unity Game View.
- For the application to work on device you must request and grant the Spatial Mapping Permissions which we will do in the next section.
Part 4: Handling Head Pose Loss and Movement
In this section, we will create a script to manage head pose loss and update the position of the Meshing Subsystem based on the user's head position.
- Create Meshing Controller Script:
- Create a new script named
MeshingController.csand attach it to a suitable GameObject in your scene (e.g., Meshing Subsystem). - Copy the provided code into your
MeshingController.csscript. This script will handle head pose loss and set the position of the Meshing Subsystem Component to the position of the headset to ensure the environment closest to the user generates a mesh.
- Create a new script named
using System.Collections;
using System.Collections.Generic;
using UnityEngine;
using UnityEngine.XR;
using UnityEngine.XR.MagicLeap;
using UnityEngine.XR.Management;

public class MeshingController : MonoBehaviour
{
    private XRInputSubsystem inputSubsystem;
    private MeshingSubsystemComponent meshingSubsystemComponent;

    // Start is called before the first frame update
    private void Start()
    {
        meshingSubsystemComponent = FindObjectOfType<MeshingSubsystemComponent>(true);
        var xrMgrSettings = XRGeneralSettings.Instance.Manager;
        if (xrMgrSettings != null)
        {
            var loader = xrMgrSettings.activeLoader;
            if (loader != null)
            {
                //Calls event if tracking origin is changed
                inputSubsystem = loader.GetLoadedSubsystem<XRInputSubsystem>();
                inputSubsystem.trackingOriginUpdated += OnTrackingOriginChanged;
            }
        }
    }

    private void Update()
    {
        _meshingSubsystemComponent.gameObject.transform.position = Camera.main.transform.position;
    }

    private void OnTrackingOriginChanged(XRInputSubsystem inputSubsystem)
    {
        //Destroy existing meshes under the mesh parent prefab
        _meshingSubsystemComponent.DestroyAllMeshes();
        //Force update all mesh prefabs
        _meshingSubsystemComponent.RefreshAllMeshes();
    }
}
Part 5: Testing Your Setup
Having configured the Meshing Subsystem, it's time to test your setup and see the meshing in action.
- Save your scene and make sure it is present in the Build Settings
- Test the project using the Magic Leap App Simulator or Build and Run on the headset to observe the meshing functionality in action.
Other Configurations
The following table explains the function of each of the public attributes of the Meshing Subsystem Component script:
| Mesh Prefab | Get or set the prefab which should be instantiated to create individual mesh instances. May have a mesh renderer and an optional mesh collider for physics |
| Compute normals | When enabled, the system will compute the normals for the triangle vertices |
| Density | Determines the level of detail that the batched mesh blocks should be. This property is not used if custom mesh block requests are created via the SetCustomMeshBlockRequests() method. |
| Batch size | Determines how many mesh blocks should be requested by the meshing subsystem at once. This property is not used if custom mesh block requests are created via the SetCustomMeshBlockRequests() method. How many meshes to update per batch. Larger values are more efficient, but have higher latency. |
| Mesh Parent | The parent transform for generated meshes. |
| Requested mesh type | The current mesh type being surfaced by the subsystem provider. |
| Fill Hole length | Boundary distance (in meters) of holes you wish to have filled |
| Planarize | When enabled, the system will planarize the returned mesh (planar regions will be smoothed out). |
| Disconnected component area | Any component that is disconnected from the main mesh and which has an area less than this size will be removed. |
| Mesh queue size | Controls the number of meshes to queue for generation at once. Larger numbers will lead to higher CPU usage. |
| Polling rate | How often to check for updates, in seconds. More frequent updates will increase CPU usage. |
| Request vertex confidence | When enabled, the system will generate confidence values for each vertex, ranging from 0-1. |
| Remove mesh skirt | When enabled, the mesh skirt (overlapping area between two mesh blocks) will be removed. This field is only valid when the Mesh Type is Blocks. |
| Object Pool size | Amount of objects that can be viewed at onc. |
| Object Pool growth rate | How quickly the object pool gets generated. |