XR Hand Interaction Demo
This guide will demonstrate how to configure the Unity XRI Hands Demo Scene to work with the Magic Leap 2.
Prerequisites
Permissions
- Go to Edit > Project Settings > MagicLeap > Permissions and enable the
HAND_TRACKINGpermission
Install the XR Hands package
The Magic Leap Unity OpenXR SDK requires version 1.4.0-pre.1 or higher of the Unity XR Hands package.
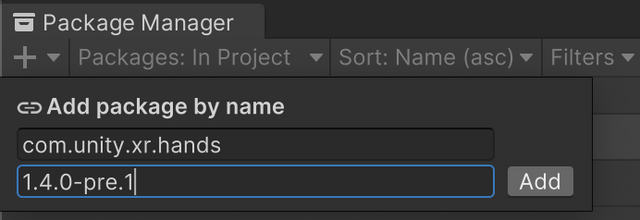
Open the Package Manager window (Window > Package Manager).
Click the "+" icon in the upper-left corner and select Add Package by Name.
Enter the following details
Open the Package Manager and select the XR Interaction Toolkit.
Select Add Package By Name. Add the following:
- Name:
com.unity.xr.hands - Version:
1.4.0-pre.1
Import Starter Assets and the Demo Scene
Follow the following instructions to integrate the XR Hand Interaction demo into your project.
- In the Package Manager, locate the "XR Interaction Toolkit" package.
- Under the "Samples" tab, import both the "Starter Assets" and "Hands Interaction Demo" samples.
If you are adding the Hands Interaction Demo to the Magic Leap Samples project you will need to remove the hand tracking visualization scripts that were included in the project before importing the new sample packages.
Modify the Hands Demo Scene
- In the Assets folder navigate to the Hands Interaction Demo Directory
Assets/Samples/XR Interaction Toolkit/2.5.2/Hands Interaction Demo - Open the "HandsDemo" scene.
- In your project's Hierarchy window, expand the "XR Interaction Hands Setup" object.
- Select the child object named "XR Origin (XR Rig)"
- In the Inspector window, locate the "XR Origin" component.
- Set the Tracking Origin Mode to Device.
- Select the Main Camera from the hierarchy.
- In the Inspector window, find the "Camera" component.
- On the Camera component, set the Background Type to "Solid Color"
- Click the color swatch next to "Background Type" and set the RGBA values to (0, 0, 0, 0).
Configure Input Action bindings for Magic Leap 2
In the Project window, navigate to the following path:
Assets/Samples/XR Interaction Toolkit/Version/Starter AssetsDouble-click the asset named XRI Default Input Actions to open the editor.
Modify the bindings in the following way by pressing the
Tbutton next to the binding name field in the Binding Properties window, copying the following values and hitting enter:
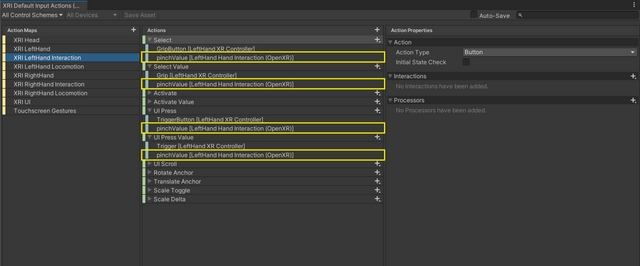
XRI LeftHand:
- Position:
- First:
<XRHandDevice>{LeftHand}/devicePosition
- First:
- Rotation:
- First:
<XRHandDevice>{LeftHand}/deviceRotation
- First:
- AimPosition:
<HandInteraction>{LeftHand}/pointerPosition - AimRotation:
<HandInteraction>{LeftHand}/pointerRotation

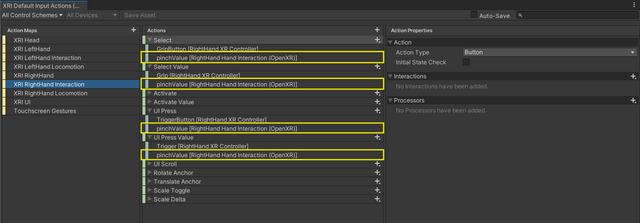
XRI RightHand:
- Position:
- First:
<XRHandDevice>{RightHand}/devicePosition
- First:
- Rotation:
- First:
<XRHandDevice>{RightHand}/deviceRotation
- First:
- AimPosition:
<HandInteraction>{RightHand}/pointerPosition - AimRotation:
<HandInteraction>{RightHand}/pointerRotation

XRI LeftHand Interaction:
- Select:Replace the second binding with
<HandInteraction>{LeftHand}/pinchValue. In the Binding Properties window, click the plus icon next to Interactions and add a Press interaction and set the following:- Trigger Behavior: Press Only
- Press Point: Uncheck "Default" and set the value to 0.75
- Select Value:Replace the second binding with
<HandInteraction>{LeftHand}/pinchValue. - UI Press:Replace the second binding with
<HandInteraction>{LeftHand}/pinchValue. In the Binding Properties window, click the plus icon next to Interactions and add a Press interaction and set the following:- Trigger Behavior: Press Only
- Press Point: Uncheck "Default" and set the value to 0.75
- UI Press Value:Replace the second binding with
<HandInteraction>{LeftHand}/pinchValue.
XRI RightHand Interaction:
- Select:Replace the second binding with
<HandInteraction>{RightHand}/pinchValue. In the Binding Properties window, click the plus icon next to Interactions and add a Press interaction and set the following:- Trigger Behavior: Press Only
- Press Point: Uncheck "Default" and set the value to 0.75
- Select Value:Replace the second binding with
<HandInteraction>{RightHand}/pinchValue. - UI Press:Replace the second binding with
<HandInteraction>{RightHand}/pinchValue. In the Binding Properties window, click the plus icon next to Interactions and add a Press interaction and set the following:- Trigger Behavior: Press Only
- Press Point: Uncheck "Default" and set the value to 0.75
- UI Press Value:Replace the second binding with
<HandInteraction>{RightHand}/pinchValue.
- Save the asset.
These settings will configure the input system to work with Magic Leap hand tracking.
Build and Deploy
Connect your device and follow the Building to Device steps in the Simple App guide.
You'll be able to interact with the UI elements and objects in the scene.