Hand Tracking Design Guide
This guide provides design guidelines and best practices for the hand-tracking capabilities of Magic Leap 2.
You can use hand tracking as an input method within the apps you develop by using the available hand tracking and gesture classification APIs. In addition, users can choose to enable more hand-tracking features available in the Magic Leap 2 OS, although this doesn't affect the hand-tracking capabilities of your apps.
For information on developing apps that include hand tracking, see the Hand tracking developer guide in this developer portal.
For information about the hand-tracking features available to end users in the Magic Leap 2 OS, the Hand Tracking Guide in the Magic Leap Care portal.
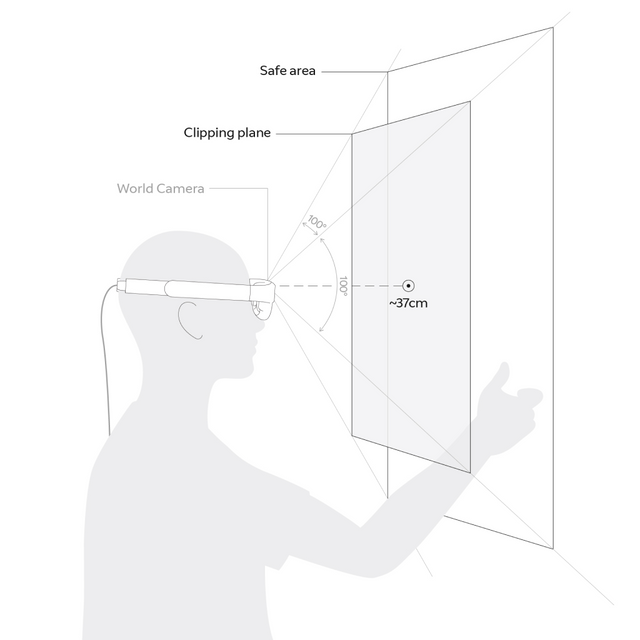
Field of Sensing and Display Zone Near Boundary
Hand gestures are only detected within the field of sensing, which is the field of view of the Magic Leap headset world camera. Near the edges of the field of sensing, hand tracking might work less effectively.
The near boundary of the Display Zone, also known as the near clipping plane, is the limit of how close virtual content can be displayed. Any virtual content attached to the user’s hand disappears when it crosses the near boundary of the Display Zone.
Users can interact with content within the field of sensing and Display Zone.
For maximum comfort, the near boundary of the Display Zone is set to 37 cm by default. At closer distances, there is an increased likelihood of discomfort, such as eye strain, blurring, double vision, dizziness, and nausea. For more information about how users experience virtual content close to the near boundary of the Display Zone, see Display Zone and Clipping Plane.
Content Placement
The Magic Leap OS has two options for virtual content and user interface (UI) location, and corresponding interaction modes:
- Near field interaction: Interaction with virtual content or UI elements at approximately 50 cm distance.
- Far field interaction: Interaction with virtual content or UI elements at approximately 1 m distance.
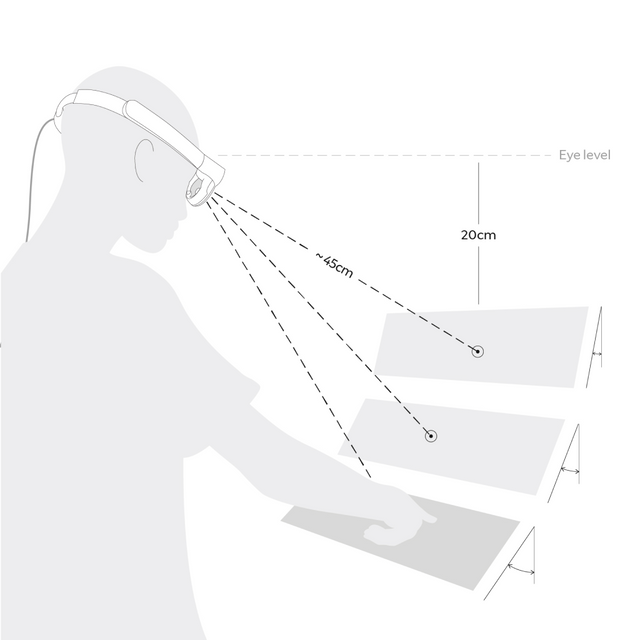
Near Field Interaction
For near field interaction, ideally content is placed about 45 cm in front and about 20 cm lower than the eye level to avoid arm fatigue. The lower the two-dimensional content is from the user’s eye level, the more tilted it should be from the vertical. This ensures comfort when interacting with content.
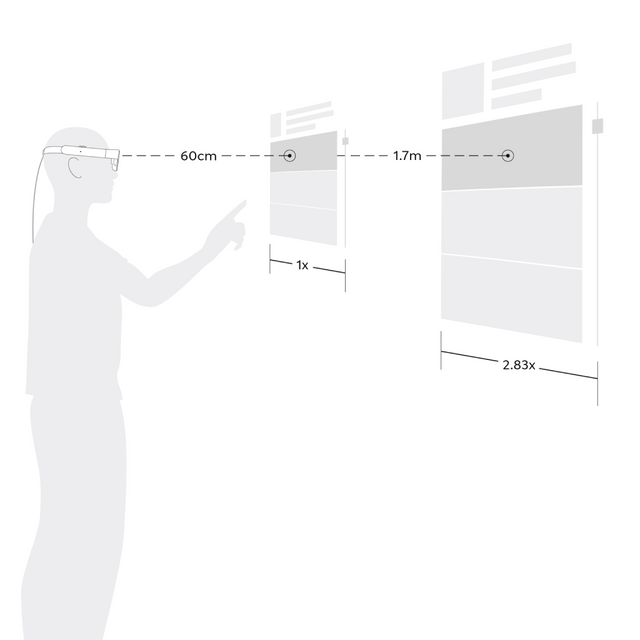
Far Field Interaction
For far field interaction, content should be placed between 60 cm and 1.7 m from the user. This is far enough to interact comfortably with the pinch gesture and close enough to be visibly legible. The further the object is from the user, the larger the UI buttons should be.
Interacting With Content
When designing interactions with content, different gestures are needed for near field interactions and far field interactions.
Many basic hand-tracking interactions are available out of the box in MRTK. See Magic Leap MRTK3 Package.
Near Field Gestures
Use poke and pinch gestures for near field interactions.
Select. Poking in the near field is the most comfortable and intuitive gesture. Do not place content where the poking finger might be occluded from the headset's camera.

Scroll vertically or scroll horizontally. Use the poke gesture for scrolling in the near field:
- Poke and hold.
- Move in the desired direction and release.
Grab: Use the pinch gesture for moving a virtual object:
- Pinch and hold.
- Move in the desired direction and release.
Far Field Gestures
Use pinch gestures for far field interactions.
Select. Use the pinch gesture for selecting an object in the far field:
- Aim.
- Pinch to select.
Scroll vertically or scroll horizontally. Use the pinch gesture for scrolling in the far field:
- Aim.
- Pinch and hold.
- Move in the desired direction and release.
Grab: Use the pinch gesture for moving a virtual object:
- Aim.
- Pinch and hold.
- Move in the desired direction and release.
Interactions With the Controller
If you are designing interactions that include input from the Magic Leap 2 controller and user's hands:
- Clearly separate these inputs.
- Design a method to recognize which type of input is being used.
More Design Guidelines
For general guidelines about user comfort and content placement for Magic Leap 2, see Comfort and Content Placement.