This scene demonstrates Magic Leap 2's peer-to-peer WebRTC functionality using a Python bottle server. The Magic Leap 2 and a computer sharing the same local WiFi network can share video and audio streams.
To run the WebRTC example, you need to set up two parts - the server on your computer, and the scene on your device. This section goes over both parts.
For this example to work correctly, you need both your computer and the Magic Leap device connected to the same network.
Open a command-line interface (CLI) for example: Command Prompt on windows or Terminal on Mac and Linux.
Find and make note of your computer's local IP address by entering the following command:
Mac and Linux: ifconfig
Windows: ipconfig
tip
Often, local IP addresses start with 192.168.1.X. Each device on your network will have a unique number in the last position. However, your address might follow a different pattern, like 10.0.0.X. Always check your configuration before moving forward.
In the CLI, navigate to the Server directory inside the Magic Leap Examples project.
cd <PATH-TO-YOUR-PROJECT-FOLDER>/Assets/MagicLeap/Examples/WebRTCSetup/Server
Start the server by running the following command:
When prompted, grant access to both the camera and microphone. Once granted, you should see your computer's camera feed displayed in the left video box.
This section walks you through configuring and running the Unity WebRTC example on Magic Leap 2.
Power on the Magic Leap 2 and connect the device to your computer. Allow USB debugging if prompted.
Open the Unity Hub.
Open Project in Unity
Click Open Project.
Navigate to the Magic Leap examples folder. The path will be wherever you placed your Magic Leap folder, then inside the folder, navigate through MagicLeap > tools > unity > version > MagicLeap_Examples.
Open MagicLeap_Examples as your project. For the version item, it will list the latest version, so you will see something in the pattern of v1.8.0 or similar.
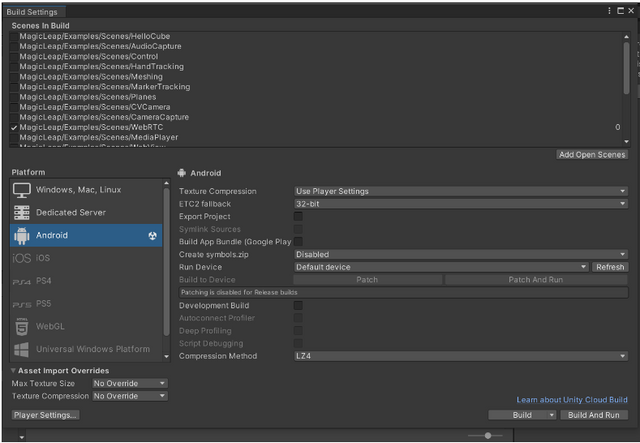
When the project opens, click File. Choose Build Settings.
Build Settings
Under Scenes in Build, put a checkmark next to MagicLeap/Examples/Scenes/WebRTC.
Make sure your Magic Leap 2 device is powered on, and configured for developer mode (instructions for setup if you haven’t done this yet are in the Requirements section). Plug the device into your computer via the Compute pack.
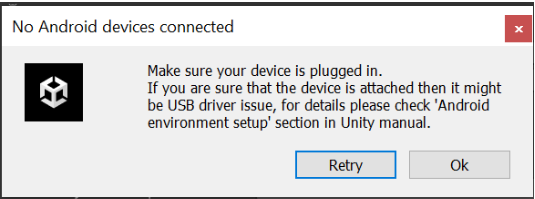
Click Build and Run. If you don’t have a folder for Unity builds yet, create one when you’re asked for what you want to name your build. This is a best practice. If your device isn’t connected, you may get this message:
Device Connection Prompt
If this happens, make sure everything is plugged in, then click Retry.
When your project builds, put on your Magic Leap 2 headset. Accept the prompts and your webRTC experience should begin. You’ll be able to tell because there’s a floating menu about webRTC, and your controller’s pointer beam will appear red. Behind the floating menu, you should see a screen asking you to enter a server address.
Move the floating menu out of the way, and using the controller, enter the address of your server (for example, 192.168.1.15X).
Click Connect.
Go back to the browser you set up with your webRTC example. You should now see yourself in the left panel as your computer camera would see you and in the right panel, you should see what your Magic Leap 2 headset sees. The smaller, second chat box is now active. You can type something and press Send, then look in your headset to see the message arrive. Likewise, using your controller on your headset, you can type something back, click Send and it will appear in the first, bigger chatbox on your web browser.
To get more information on what errors are occurring on device, you can use the logs from the device bridge.
If you're having difficulties connecting over the local network, you may need to disable firewalls, particularly on port 8080.
You must enable the CAMERA and RECORD_AUDIO permissions in the Unity Project Settings. It’s often enabled by default, but you can double check if you encounter issues. Refer to the Permissions Guide for more information.