Segmented Dimming
Magic Leap 2's Segmented Dimming API allows applications to dim portions of the display so that content appears opaque. The dimmer uses a lower resolution panel and therefore, developers must be conscious of it's use and is best used for larger objects.
As of the February 2023 release, all virtual content will dimmed at runtime as opposed to at compile-time. This will allow for external assets to be imported from outside of a projects codebase, such as a 3D model from a CDN, and have dimming applied to them.
Prerequisites
- Segmented Dimming is enabled on the device
- You must enable the dimmer in the Android Settings app on the headset by going to Settings > Display > Segmented Dimming.
Simple Usecase
All content will have Segmented Dimming applied to it.
Ensure the renderer does not include the Segmented Dimmer Renderer Feature.
In a Scene where Segmented Dimming is desired, simply call the following to apply dimming to all virtual content meshes:
using UnityEngine.XR.MagicLeap;

...

MLSegmentedDimmer.Activate()
...
Advanced Usecase
Using the Universal Render Pipeline with dedicated meshes and configurable shader.
Setting Up Your Project
- Set up your Unity Project for Magic Leap 2 by completing the Unity Getting Started guides.
Create the Segmented Dimmer Layer
Your project must have one Layer dedicated to the Segmented Dimmer.
- Head to Edit > Project Settings > Tags and Layers
- Select an unused User Layer and give it an appropriate name, like "SegmentedDimmer"
Configure the Render Pipeline
- Follow the directions in the Unity Configure Project Settings guide for Magic Leap 2 to make sure your project is set up with the Universal Render Pipeline (URP).
Configure your URP renderer
If you created the project using the URP Template, you'll find the pre-made assets in Assets/Settings. The most recent version of the Template generates 3 sets of URP assets for you - "Balanced", "HighFidelity", and "Performant". You can see which one the project defaults to using by opening Project Settings > Graphics.
If your project is older and originated on an old version of the URP the renderer asset might be called ForwardRenderer.asset instead.
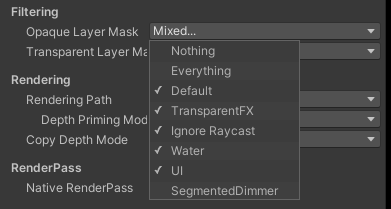
Filter the Renderer via layer masks
Find and select the Universal Render Pipeline Asset_Renderer component inside the Project > Assets > Settings folder.
With the Renderer component selected, check the following in the Inspector window:
- Opaque Layer Mask: Uncheck your SegmentedDimmer Layer
- Transparent Layer Mask: Uncheck your SegmentedDimmer Layer
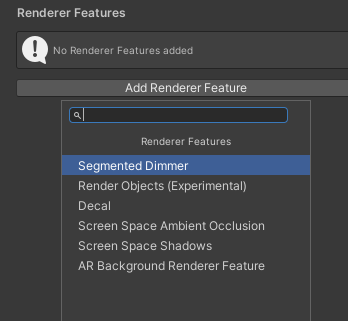
Add the Segmented Dimmer Feature
The Segmented Dimmer effect is enabled via a Renderer Feature:
- With your Universal Render Pipeline Asset_Renderer selected, at the bottom of the Inspector window click the Add Renderer Feature button.
- Select Segmented Dimmer.
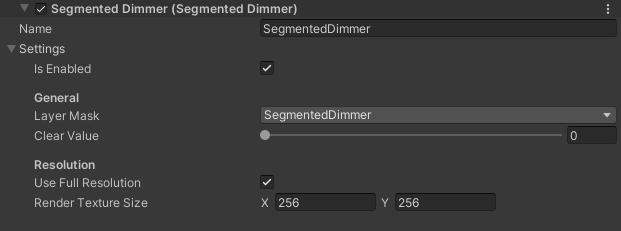
Configure the Segmented Dimmer Feature
- Layer Mask: Select only your SegmentedDimmer Layer
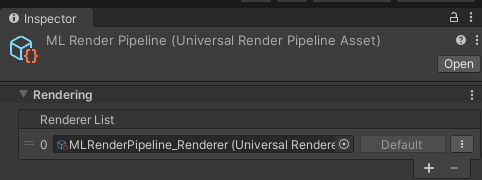
Assign the Render Pipeline
This might not be necessary if you modified a pre-made renderer asset in a project created from the URP Template, but follow along just to make sure your project is configured correctly.
- Select your URP settings asset.
- In the Inspector, at the top, ensure your renderer asset is assigned to the Renderer List.
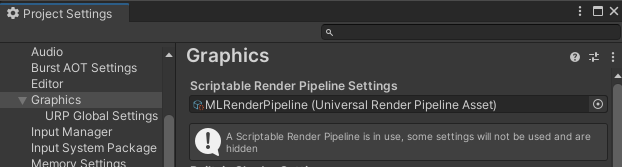
- In Project Settings > Graphics, ensure your settings asset is assigned as the Scriptable Render Pipeline Settings provider.
 |  |
Scene Setup
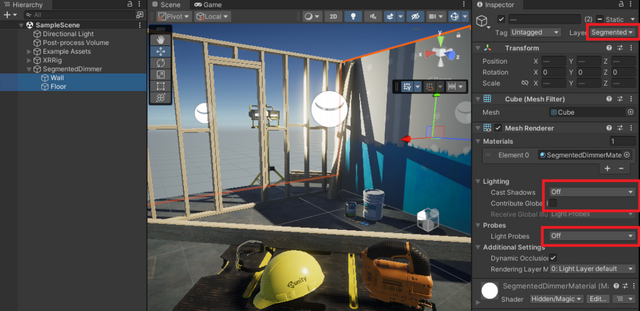
In your scene, create a mesh GameObject (or many if needed) - this can be a Cube, Sphere, or anything - that will be used as a mask for the Segmented Dimmer.
- Set the new GameObject's Layer to your SegmentedDimmer Layer.
- Assign the Segmented Dimmer Material provided by the Magic Leap XR Plugin to your Segmented Dimmer GameObject, which you can find in Packages > Magic Leap XR Plugin > Runtime > URP > Segmented Dimmer Material.
With this GameObject selected, look in the Inspector under the Mesh Renderer component, and DISABLE the following to avoid unexpected side-effects:
- Lighting > Cast Shadows set to off
- Lighting > Contribute Global Illumination unchecked
- Probes > Light Probes set to off
For 2D/ UI Elements: Place the Segmented Dimmer mesh planes behind other scenery to dim their background and make them visually "pop". Place them in front of objects to dim or obscure them in shadow.
For 3D elements: Place the Segmented Dimmer mesh objects in the same exact location as the object you want to surround with the Segmented Dimmer and scale it up to your desired size. You may need to test out different sizes of the mesh in order to get the desired Segmented Dimmer border width around the object.
Troubleshooting
If you are having trouble seeing the Segmented Dimmer in your scene after completing the instructions above, try the following:
- Verify that Segmented Dimming is enabled at the OS level inside the Settings application on the headset.
- Increase the scale of the Segmented Dimmer mesh object. The Segmented Dimmer optical layer is at a lower resolution than the other display layers, which means some size adjustment may be necessary for the segmented dimming to fully appear around the object you are trying to highlight.
- Delete and re-create a new URP Asset by going to Create > Rendering > URP Asset (With Universal Rendering).
public bool CheckDimmerMode()
{
  // Get context
  using (var actClass = new AndroidJavaClass("com.unity3d.player.UnityPlayer"))
  {
      var context = actClass.GetStatic<AndroidJavaObject>("currentActivity");
      AndroidJavaClass systemGlobal = new AndroidJavaClass("android.provider.Settings$System");

      var dimmerMode = systemGlobal.CallStatic<int>("getInt", context.Call<AndroidJavaObject>("getContentResolver"), "is_segmented_dimmer_enabled");

      Debug.Log("Dimmer Mode is set to : " + dimmerMode);

      return dimmerMode > 0;
  }
}
Open Display Settings
You can use an Intent to launch the device's Display Settings. From there the user can choose to enable or disable the segmented dimmer.
public void OpenDisplaySettings()
{
  using (var unityClass = new AndroidJavaClass("com.unity3d.player.UnityPlayer"))
  using (AndroidJavaObject currentActivityObject = unityClass.GetStatic<AndroidJavaObject>("currentActivity"))
  using (var intentObject = new AndroidJavaObject("android.content.Intent", "android.settings.DISPLAY_SETTINGS"))
  {
     currentActivityObject.Call("startActivity", intentObject);
  }
}