Android Studio Workflow
Overview
This section outlines the steps required to build Native applications (including sample applications) using an Android Studio workflow for Magic Leap 2 devices and App Simulator.
Prerequisites
- Download the ML Hub and the latest Magic Leap C SDK (MLSDK).
- Complete the Environment Setup Instructions.
- Download the latest C-API Samples package from the Package Manager within the ML Hub
The MLSDK must be installed into a path without spaces.
The instructions below assume that all the content has been extracted to the {USER} directory.
Setup
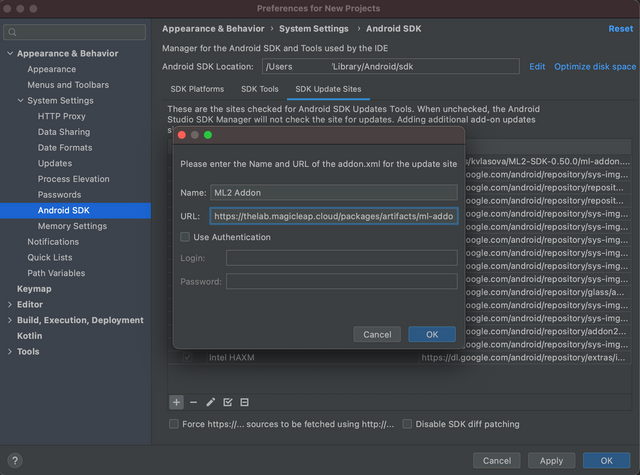
- Open the Android Studio SDK Manager by going to Tools > SDK Manager
- Under the SDK Update Sites tab, create a new entry pointing at ml-addon.xml by inserting
https://thelab.magicleap.cloud/packages_mlhub/artifacts/ml-addon.xmlin the URL field
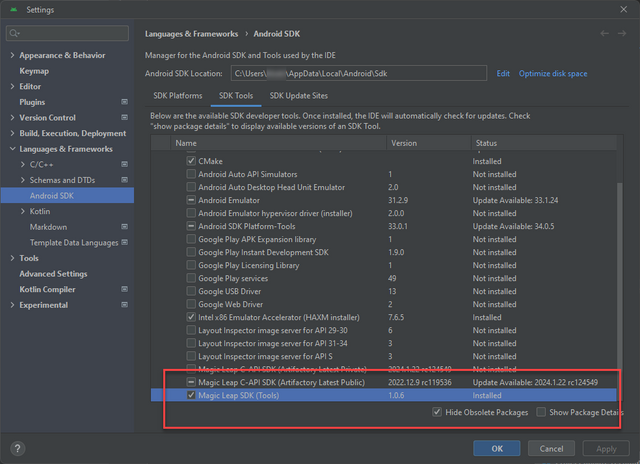
- Under the SDK Tools tab, select and install both the Magic Leap SDK (Tools) and the Magic Leap SDK.
If you are having issues with the steps above taking effect, restart Android Studio.
Building Signed Release APKs in Android Studio
If you would like faster and easier rebuilds and don't mind a little setup beforehand, follow these steps:
- Go to Settings > Build, Execution, Deployment > Compiler > Command-line Options and add:
-Proot_path=<your path to parent directory of samples/directories>
The path must be an absolute path, with no environment variables like ${REPO_ROOT} and have a slash at the end. For example:
/home/user/Downloads/sdk_native_samples_src/
- Go to Build > Select Build Variant... and change the Active Build Variant table cell to ml2Release for release builds or ml2Debug for debug builds.
Alternatively, you can build both signed releases and debug APKs following these steps:
- Go to Build > Generate Signed Bundle / APK...
- Choose APK.
- (Optional) If you do not have a certificate, generate a new one using Key store path > Create new...
- Fill out fields with data from the certificate and click Next.
- Choose the build variants that you want to build (“ml2Release”, “ml2Debug”, or both).
- Click Finish to build.
Generating Certificates for Signed Release APKs
For building signed release APKs, you need the following files in your scripts/ directory:
keystore.propertiesmlsdk.keystore
Your scripts directory won’t have these files, so you need to create them yourself.
keystore.propertieshas the following structure:
storePassword=<mlsdk.keystore password>
keyPassword=<key password>
keyAlias=<key alias>
storeFile=<path to mlsdk.keystore>
The <path to mlsdk.keystore> will be appended to the parent directory of samples/ directories like so:
/home/user/Downloads/sdk_native_samples_src/<path to mlsdk.keystore>
mlsdk.keystorefile can be generated using either:
- keytool command, supplied by Java JDK installation
- Android Studio in Build > Generate Signed Bundle / APK... > APK > Key store path > Create new...
Installing and Launching Apps via Command Line
adb install <path_to_apk>
adb shell am start -a android.intent.action.MAIN -n <app_package_name>/android.app.NativeActivity
To uninstall use this command:
adb uninstall <app_package_name>
For more ADB commands, reference the ADB Commands Guide.
App Simulator is a tool that allows you to test your apps on your Windows PC or macOS without needing to build to the device. When you build apps for App Simulator, you must build them using the App Simulator Launcher. To learn more about App Simulator, check the App Simulator Guide.