Dimming Design Guidelines
In this article, we discuss how you can use the global and segmented dimmer in your applications to experiment with improving the contrast and opacity of your content. resulting in text that is more legible, menus with greater contrast to the environment, and objects that appear more solid.
What is Global Dimming?
Global Dimming is a tint applied over the entire display, behind your content. It sets a single opacity value that dims the real-world environment. Global Dimming is an exchange between two valuable resources: the visibility of the user’s environment, and the device’s content opacity (including image quality).
For example, if a user is in a bright room watching content, the application may request Global Dimming be set to a high (dark) value.
If the user is in a poorly lit room, talking with a coworker, the application may prioritize being able to see the coworker well and set Global Dimming to the minimum value.
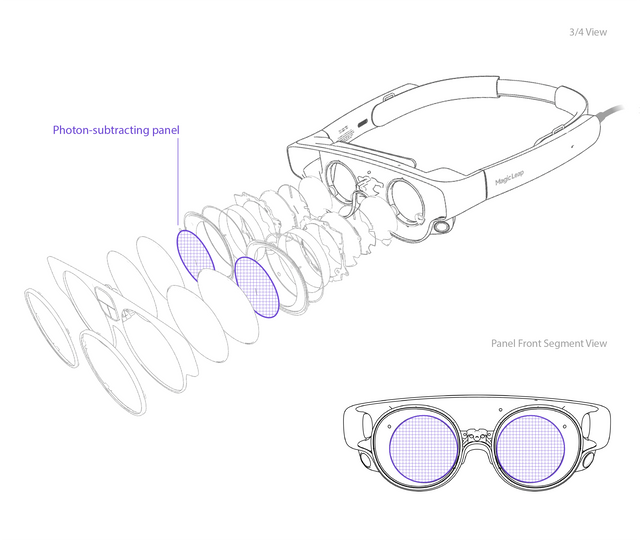
What is Segmented Dimming?
Unlike Global Dimming, Segmented Dimming utilizes the dimmer panel to allow specific portions of content to be dimmed—making virtual content appear more opaque without needing to tint the entire display.
| Global Dimming | Segmented Dimming |
|---|---|
 |  |
Benefits of Segmented Dimming
- Ability to visualize black pixels in a commercial AR platform
- High opacity content in even brightly lit environments
- Increased color contrast for virtual content
Using the Segmented Dimmer
Segmented Dimming is currently in an experimental stage of development; continuously evolving as we discover new use-cases and best practices.
It’s best used for the following formats:
- 2D, static content (images/videos) using approximately 40-70% of the FOV
- Square or Rectangular UI Menus/Panels
- Multi-line text (can be floating or have a backplate)
The following design guidelines are still in development:
- Complex shaped geometry with fine details
- Small sized content, including UI buttons
- Particle effects
- Very thin content
- Sharp-edged content
- 3D, and/or animated content
- Content that is very large and close to the user
- Content that is small and very far from the user
Content Distance and Placement
We recommend placing content between 0.5m and 1.4m away for the greatest visibility of Segmented Dimming and content comfort.
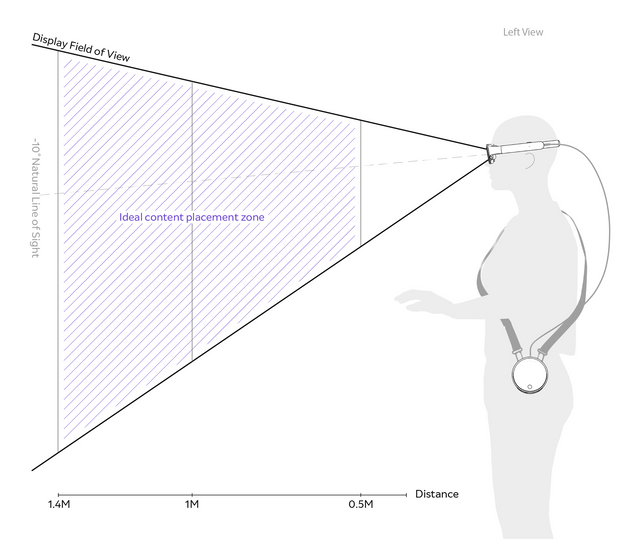
Head-relative Content
When head-relative content is placed farther away from the user, the mask and content will appear to be misaligned during subtle head movement.
Creating a Dimmer Mask
To use the Segmented Dimmer, you’ll apply a mask that matches the size and shape of your content. For step-by-step instructions on how to apply and adjust Segmented Dimming Masks, follow our Segmented Dimming in Unity guide.
The Segmented Dimmer panel is not for use with highly-detailed content as its resolution is not currently high enough to create parity with virtual content. Rapid head movement causes separation between content and its mask, and may cause flickering and smeared effects.
Shape of the Mask
The most helpful mask shapes are rectangles and ovals. Due to the low resolution of the Dimming Panel, adding corner radiuses and feather don’t create significant changes in perceived shape of the dimmed area to the user unless the mask and content are large in the FOV.
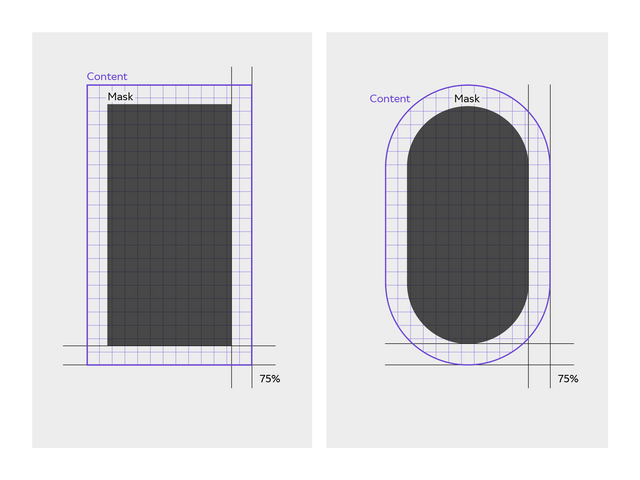
Size and Distance of the Mask
If you are trying to create a tight dimming effect for your content, we recommend the mask size be a minimum width and height of 15px, and distance of 0.8m to see a significantly dimmed area at the set opacity (this is based on the dimmer’s panel resolution).
It’s best to create a mask that is slightly offset from the edges of the geometry edges and shares the same shape. A good rule of thumb is keeping the size of the mask 75% of the content’s edges and scaling this ratio across different distances. We recommend thinking in terms of DMMs. Avoid placing content too close to the clipping plane and creating Segmented Dimming masks that take up the whole FOV; you will create a hazard and an annoying user experience.
If you’d like to experiment further or achieve a drop shadow effect for your content, you can adjust the height, width, corner radius, and feathering to achieve different drop shadow aesthetics.
Behavior of the Mask
The dimming mask renders 1:1 with the content, whether your content is head, body, or world-relative at 120 fps.
At this time, we don’t recommend applying a mask to 2D content that is moving or has animations.
Instances of Masks
Avoid applying multiple masks to many types of content on a screen, as this is uncomfortable for the user (due to the shortcomings mentioned earlier). Suggestion: Try being intentional about why certain elements are dimmed and others are not. Are you trying to bring certain elements into focus more than others?
Understanding the Halo Artifact
Due to the dimmer being only a few mm from your eyeball, and not remotely focused on your application content, your dimmer mask will not be in focus. If you match virtual content and a dimmer mask, you will get a black rolloff that looks like a dark halo. The resulting blur is ~3 degrees depending on various factors. In certain lighting conditions it can be distracting and may cause some discomfort. A critical part of good content design is hiding this halo.
More Ways to Reduce the Visibility of the Dark Halo
Increase display brightness and reduce seg dimming opacity. If you’re indoors or in an office environment, chances are you may not need to increase Segmented Dimming all the way to 100%. Our early investigations suggest that display brightness and a lower solidity of Segmented Dimming may make the halo less apparent.
Add a border. We recommend using a thickness of 10px or greater and using content that may look good with a border, such as: photos, videos, menus, text boxes, and other UI. Bright colors are more visible than dark blacks or grays. Avoid using white borders in bright light conditions, as those make the halo appear more visible.

- ‘Blend’ Global Dimming and Segmented Dimming. Using light Global Dimming or similar opacities may also decrease the appearance of the halo by blending the two areas. In the above example, we set the Global Dimmer to 40 in the application and the Segmented Dimming to 40 as well.
This is dependent on the user allowing Permissions to change their own dimmer settings.
Have proper fit and eye calibration. Encourage your users to run the Custom Fit app to improve their wear of the headset and alignment of the Segmented Dimmer panel with content.
Immerse the user in lower light conditions. The halo and other artifacts may be more pronounced in bright light environments and less apparent at medium-high solidities in lower-light environments.
Other Considerations
There are other considerations as you start to apply Segmented Dimming to your content:
- It’s tough to align your mask perfectly because of all of the physics working against you.
- Pupil diameter changes scale slightly.
- Parallax from moving your eye left to right shifts the dimmer mask.
- The headset shifting on your head causes the dimmer mask to move.
- We try to correct for these factors through factory calibration, eye tracking, and physics modeling. However, you cannot assume a perfectly aligned mask.
- At lower brightness levels, there may be flickering effects in the solid part.
- Without the use of Global Dimming, the display has a slight yellow tint. Turning on the Global Dimmer adds a gray tint and helps correct display uniformity.
- At the moment, some users may notice a slight misalignment of the dimmer mask. A solution will be provided in upcoming releases. In the meantime, you may adjust the offset manually.