Capture
The Capture view allows you to record high quality video at up to 4K resolution and audi. While recording is active, the video stream in the Capture view is stopped. This is because the cameras on your Magic Leap 2 are being used to record video directly onto the device and cannot send the video stream signal to the hub. If you want to view a video stream in the hub of what you see in the headset, then use the Stream view instead.
Recording quality in the Stream view is limited to 1080p resolution and can only capture the virtual audio played on your device.
This section walks through everything you can do with the Capture view.

New Connection Request
When your device is connected to Magic Leap Hub 3 and you navigate to the Capture view, a prompt will appear in your headset asking you to accept a new connection. Follow these steps to proceed:
- In your headset, click Accept to start a video preview from your device and prepare to start capturing video and audio or images.
- (Optional) Check the box labeled Don't ask again for 30 days to automatically accept the connection request the next time you visit the Capture view.
- If the hub cannot initiate the video preview, click the Start Preview button. The New Connection Request prompt will reappear in your headset.
Once you start capturing video, audio, or an image, the video preview is no longer displayed in the hub.
Start Preview
You can show a preview of what your headset sees before starting to record or capture by clicking Start Preview. You can also start or stop a preview from the toolbar at the top of the Capture view. If a preview is displayed, click the blue outline of a square to stop showing the preview. After the preview is stopped, the icon switches to a blue outline of a play button. Click the blue outline of a play button to display a preview again.
Record Video and Audio
If you hover over the video camera icon at the top of the Capture view, it says 'Record Video.' Click the Record Video icon to start capturing video and audio. If you want to stop, click the icon again.
Capture an Image
If you hover over the photo camera icon at the top of the Capture view, it says 'Capture Image.' Click the Capture Image icon to take a photo of what your headset points at. After you click it, there's a 3 second delay by default that you can use to get into position for the photo. The final image is stored in your Capture folder, which you can navigate to at any time to view the image.
Mute
The Mute button only mutes sound from any connected audio device. This does not change what audio is recorded. You must use the Properties sidebar to configure what audio is recorded, if any.
Capture Folder
If you click the icon button with the folder and a down pointing arrow on it, you can open your Capture folder and manage your captured images.
Toggle Properties Sidebar
To close the Properties Sidebar, click the icon button with the square divided into two vertical columns. This gives the central part of the screen more space to preview your Capture. Click the Toggle properties sidebar icon button again to open it.
Three Vertical Dots
As with the other views, clicking the three vertical dots brings back the choice of going to the Settings view, Help which takes you to documentation, or Save Diagnostic Logs.
Capture Properties Sidebar Menu
Use the Capture Properties sidebar on the right side of the view to set the aspect ratio and resolution, choose what you will see and hear, set a delay before recording starts, and make simple adjustments to the appearance of your video or image.
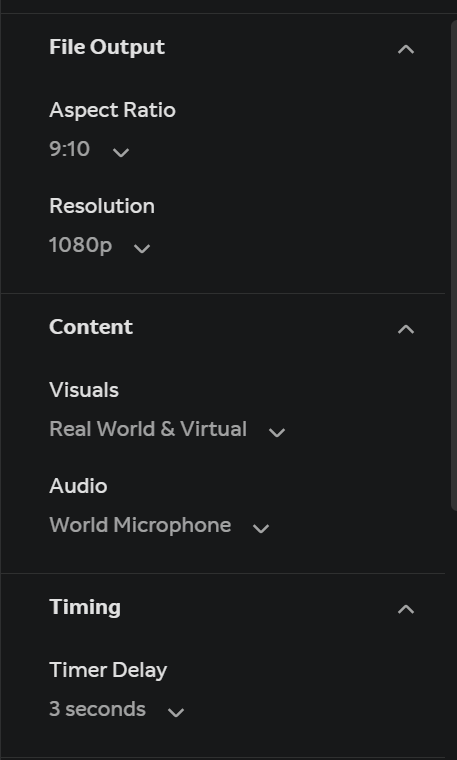
File Output
Use the File Output section of the right sidebar menu to set aspect ratio and resolution of your captured video or image. Options include:
- Aspect Ratio - 4:3 or 9:10
- Resolution - 720p, 1080p, or 4K
Content
The Content section of the right sidebar menu lets you adjust visuals and audio. Options include:
- Visuals - Real World & Virtual, Real World Only, Virtual Only
- Audio - Mixed, World Microphone, Voice Microphone, Virtual Audio
For the audio options, Mixed means that world, voice, and virtual are presented together. The other options present audio information from either world, voice, or virtual audio only.
Timing
You can set a timer to count down before a video recording begins. You can choose from:
- None
- 3 seconds
- 5 seconds
- 10 seconds
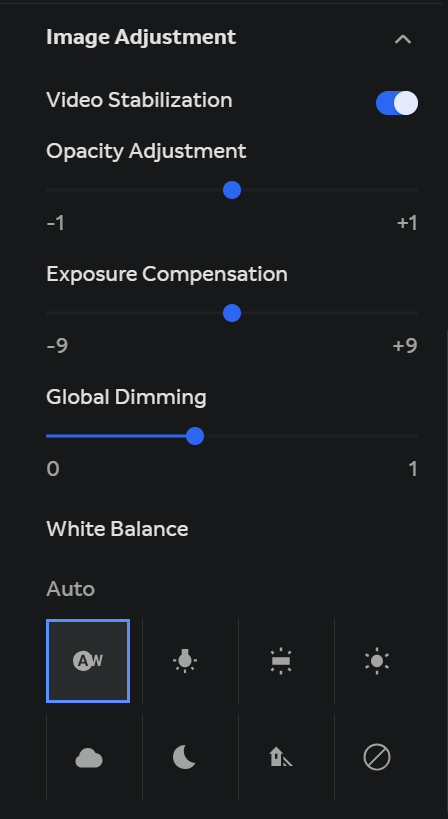
Image Adjustment
Use the Image Adjustment section of the Capture view to make changes to how your video or image appears. Options include:
- Video Stabilization - Toggle the switch to the right to enable this feature.
- Opacity Adjustment - Move the slider left or right to set the opacity.
- Exposure Compensation - Move the slider left or right to set the exposure compensation.
- Global Dimming - Move the slider left or right to set global dimming.
- White Balance - Click any of the icons to adjust the appearance of your image and video, or choose the icon with the image of a crossed out circle if you don't want to use one of the other filter choices.
Create New Preset
You can save the settings you make in the sidebar menu if you create a preset. Do the following:
Configure settings for your video or image using the right sidebar menu.
At the top of the sidebar menu, click the Properties menu icon (it looks like three horizontal lines directly above the menu).
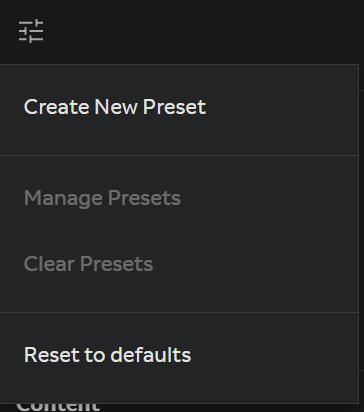
From the choices listed, click Create New Preset. A prompt opens asking you to title your new preset.
In the Preset Name field, type a name for your new preset.
Click Save. Your preset will now be applied each time you return to the Capture view. You can change it at anytime by editing the settings in the preset, or creating a new preset to use instead. You can also use Clear Presets to delete all presets you created or Reset to defaults to put back the original settings before you altered them.