AR Cloud AWS Deployment
Overview
AR Cloud is a connected service that allows Magic Leap 2 devices to access large-scale spatial data. This spatial data can be managed on the web-based console where digital twin administrators create Shared Spaces, manage device-side scans, and merge scans to contribute to larger-scale Spaces. AR Cloud admins are able to import and export spatial maps, manage large-scale digital twin deployments, and monitor Magic Leap 2 device access.
Disambiguation
The primary entrypoint to any spatially-mapped experience on a Magic Leap 2 is our Spaces tool. The Base model of ML2 can still use Spatial Anchors, albeit in an offline manner, where Spatial Maps are stored on-device.
*AR Cloud-ready refers to features described in the Benefits section of our AR Cloud Overview page. Developer Pro or the Enterprise Editions are required to get these added feature sets.
Activating a License
Learn more about managing an AR Cloud license using the guide Managing Your Magic Leap 2 License.
Technical Details
The estimated time required to complete the process is 1 hour.
Familiarity with the following tools is required to install AR Cloud for all cloud installations:
- The reader has experience with AWS EKS and Kubernetes in general
- An account in AWS is already available and the necessary privileges to create an EKS cluster are granted - this includes provisioning EC2 instances, VPC networks, subnets, creating IAM policies, roles and security groups, etc.
No user accounts or keys are created as part of this process. The cluster, however, uses Service Accounts with IAM roles assigned and Secrets where the default access credentials are automatically generated.
The installation process also uses the following solutions, but detailed knowledge about them is not required:
Unless otherwise specified, these instructions are assumed to be running inside a Debian/Ubuntu Linux environment.
Regions and Availibility Zones
The default configuration deploys the cluster in the selected region and nodes are placed in multiple availability zones. The only requirement for the region is that it supports EKS.
Provisioned Infrastructure
AWS services used by default:
- EKS - to run the Kubernetes cluster
- EC2 - to manage a dedicated VPC, node group, subnets, routes and ELB
- CloudFormation - to provision the cluster, node group and add-ons
- ELB - to get access to the services running inside the cluster
The deployed Kubernetes cluster is public by default and needs:
Additional services that can be used optionally:
- RDS - to host a database outside of the Kubernetes cluster
- S3 - to host object storage outside of the Kubernetes cluster
Deploying AR Cloud on AWS will incur a billable cost for infrastructure. We recommend monitoring and managing your costs with the following tools:
The services mentioned above are subjected to billing. Please verify the associated pricing for your configuration before use.
Required components deployed inside the Kubernetes cluster by default:
- PostgreSQL - DBMS
- Minio - object storage
- NATS - message broker
Add-ons needed in the Kubernetes cluster:
Privileges
The detailed list of the required minimum IAM privileges can be found in the eksctl documentation.
Each of the add-ons listed above uses a dedicated IAM role that is described in detail under the referenced links. The roles are need for the add-ons to be able to access and manage the underlying resources.
A root user accounts should never be used for day-to-day tasks and accounts with the least required privileges should be used instead.
For more information check the Security best practices in IAM
Stored Data
A PostgreSQL database is needed to store relational data about ML2 devices, shared spaces, maps, user accounts, etc. Apart from user account credentials (in case an external Identity Provider is not used) and geographic coordinates of the spaces, none of the data is sensitive or contains user-related information.
The AR Cloud deployment also uses an S3-compatible object storage to persist spatial maps, meshes and textures. These can potentially contain sensitive information, so it is advised to never configure the buckets to be available publicly.
For additional security, encryption can be configured for the following components:
- EBS volumes
- RDS databases - in case an external database is used
- S3 buckets - in case an external object storage is used
The data hosted for AR Cloud is not backed up by default. Backups can be configured on different levels and can include:
- EBS volumes - used by cluster node group instances and persistent volumes
- RDS databases - in case an external database is used
- S3 buckets - in case an external object storage is used
Architecture
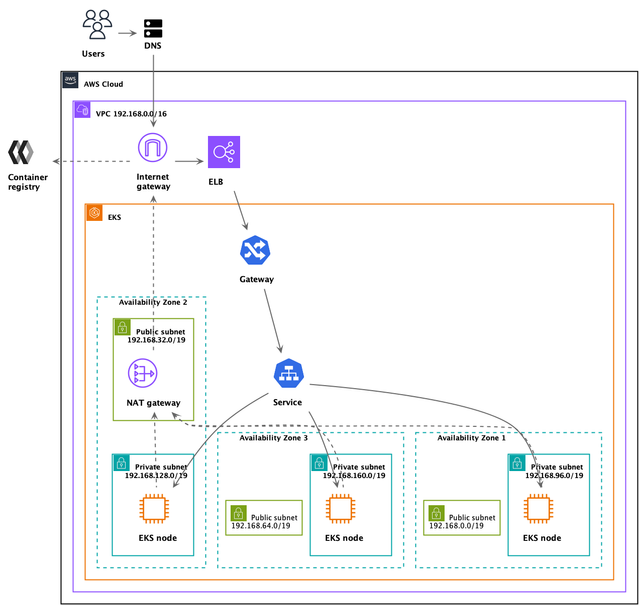
During the deployment the following resources are created by default:
a dedicated VPC - using the
192.168.0.0/16CIDRa private and public subnet for each availability zone - each with a
/19maskan Internet gateway
a NAT gateway in one of the AZs
an Elastic IP address attached to the the NAT gateway
a main route table is created automatically for the VPC
one route table for the public subnets and one for each of the private ones
a route to the local VPC network and the Internet gateway in the routing table associated with the public subnets:
destination target 0.0.0.0/0 igw 192.168.0.0/16 local a route to the local VPC network and the NAT gateway in each of the routing tables associated with a private subnets:
destination target 0.0.0.0/0 nat gw 192.168.0.0/16 local a network ACL allowing all traffic and associated with all the subnets
security groups for the VPC, EKS cluster and ELB are created automatically
a security group for communication between all nodes in the cluster
a security group for communication between the control plane and the worker nodegroups
an EKS cluster
a nodegroup for the EKS cluster
add-ons for the EKS cluster described above with the required policies and a dedicated role
an ELB for the
istio-ingressgatewaywith listeners for ports:- TCP
80/443- for HTTP/gRPC traffic without/with a TLS certificate - TCP
1883/8883- for MQTT traffic without/with a TLS certificate - TCP
15201- for status checks
- TCP
Using public networking for the node group
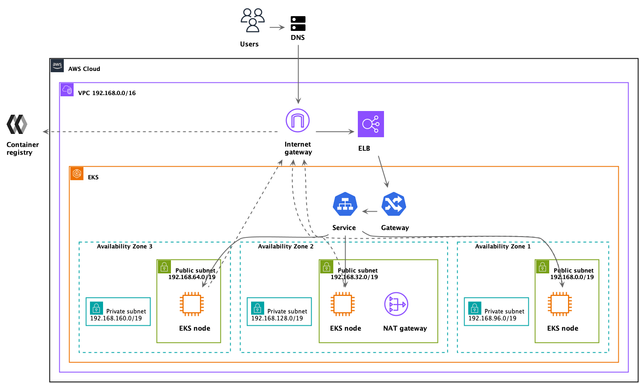
Using private networking for the node group
Setup
- Debian/Ubuntu
- Windows
- MacOS
Install Linux Dependencies
sudo apt update
sudo apt install -y curl gpg sed gettext
Install the Windows Subsystem for Linux
All following installation instructions are assumed to be running inside an activated Windows Subsystem for Linux 2 environment (Debian or Ubuntu). See the following information about installing WSL 2:
wsl --install -d Ubuntu
Launch the shell of the default WSL distribution:
wsl
Disk IO from mounted paths such as /mnt/c are known to be very slow, for this reason it is recommended to execute commands from the User's home directory.
Install Linux Dependencies
sudo apt update
sudo apt install -y curl gpg sed gettext
Install brew (Homebrew), if needed.
brew install curl gnupg gnu-sed gettext
AWS CLI
To get started as quickly as possible, refer to these simple setup steps for:
Make sure to always use the latest version of the installed tools. As the used services are upgraded some APIs might change and/or access policies be updated and it might not be possible to complete the process without having the up-to-date CLI tools.
In case a problem occurs during the deployment of the infrastructure components or services, verify if the latest version of the CLI tool was used and try again if an upgrade is available.
Tools
- Debian/Ubuntu
- Windows
- MacOS
Helm
The minimum version requirement is 3.9.x.
The 3.13.0 version of Helm introduced a bug in the way values are merged.
The deployment will not work with this version, so please use version 3.13.1 or newer where the issue is fixed.
Install Helm using apt:
curl https://baltocdn.com/helm/signing.asc | gpg --dearmor | sudo tee /usr/share/keyrings/helm.gpg > /dev/null
sudo apt-get install apt-transport-https --yes
echo "deb [arch=$(dpkg --print-architecture) signed-by=/usr/share/keyrings/helm.gpg] https://baltocdn.com/helm/stable/debian/ all main" | sudo tee /etc/apt/sources.list.d/helm-stable-debian.list
sudo apt-get update
sudo apt-get install helm
Kubectl
Helm
The minimum version requirement is 3.9.x.
The 3.13.0 version of Helm introduced a bug in the way values are merged.
The deployment will not work with this version, so please use version 3.13.1 or newer where the issue is fixed.
brew install helm
Kubectl
AR Cloud
Download the latest AR Cloud public release from GitHub:
LATEST_RELEASE=$(curl -sSLH 'Accept: application/json' https://github.com/magicleap/arcloud/releases/latest)
LATEST_VERSION=$(echo $LATEST_RELEASE | sed -e 's/.*"tag_name":"\([^"]*\)".*/\1/')
ARTIFACT_URL="https://github.com/magicleap/arcloud/archive/refs/tags/$LATEST_VERSION.tar.gz"
curl -sSLC - $ARTIFACT_URL | tar -xz
cd arcloud-$LATEST_VERSION
Configure Environment
If you do not have a key assigned for Quay.io, please contact Customer Care:
Configure the container registry details:
export REGISTRY_SERVER="quay.io"
export REGISTRY_USERNAME="<username>"
export REGISTRY_PASSWORD="<password>"
Set the cluster namespace where the AR Cloud components will be installed:
export NAMESPACE="arcloud"
Set the domain where AR Cloud will be available:
export DOMAIN="<your domain>"
Alternatively, make a copy of the setup/env.example file, update the values and source it in your terminal:
cp setup/env.example setup/env.my-cluster
# use your favourite editor to update the setup/env.my-cluster file
. setup/env.my-cluster
Infrastructure Setup
Kubernetes System Recommendations
- Version
1.25.x,1.26.x,1.27.x
Cluster Size Requirements
| Minimum | Recommended | |
|---|---|---|
| Application | development purposes and/or smaller maps | handling large maps and hundreds of devices simultaneously |
| Node range | 2 - 6 | 4 - 12 |
| Desired nodes | 4 | 8 |
| vCPUs per node | 2 | 8 |
| Memory per node (GiB) | 8 | 32 |
| Example AWS instance types | t3.large m5.large m5a.large m6i.large m6a.large | t3.2xlarge m5.2xlarge m5a.2xlarge m6i.2xlarge m6a.2xlarge |
Different instance types can be selected, but proper functioning of the cluster is not guaranteed with ones smaller than in the minimum column above.
To manage costs, consider scaling the minimum cluster size to zero.
Environment Settings
In your terminal configure the following variables per your environment:
export AWS_PROFILE="your-profile"
export AWS_ACCOUNT_ID="your-account-id"
export AWS_REGION="your-region"
export AWS_CLUSTER_NAME="your-cluster-name"
These variables are already included in the env file described above.
Sample cluster configurations
The two options below are alternatives that can be used depending on your preferences:
- Option 1 - an unmanaged node group is used, manual installation of add-ons is required
- Option 2 - an managed node group is used, add-ons and service accounts are installed automatically
In both options the created node group can be isolated from the public Internet by placing the nodes in the private subnet for each availability zone.
To enable private networking pass the --node-private-networking flag to the eksctl create cluster command.
Alternatively, the privateNetworking field for a node group can be set to true inside the eksctl sample
configuration files.
Check the eksctl subnet documentation for details.
Option 1: Bare-bones cluster with non-managed node group
Adjust the ./setup/eks-cluster.yaml file to your needs and create the cluster:
cat ./setup/eks-cluster.yaml | envsubst | eksctl create cluster -f -
Wait until the command finishes and verify the results in CloudFormation.
Confirm kubectl is directed at the correct context:
kubectl config current-context
{your-email}@{your-cluster}.{your-region}.eksctl.io
Complete the following guides to install additional required cluster components:
- Amazon EBS CSI driver:
- Installing the AWS Load Balancer Controller add-on
- Managing the Amazon VPC CNI plugin for Kubernetes add-on
In case of problems installing the VPC CNI plugin, do not provide the version, so the default one is used instead.
Option 2: Pre-configured cluster with managed node group and preinstalled add-ons
Adjust the ./setup/eks-cluster-managed-with-addons.yaml file to your needs and create
the cluster:
cat ./setup/eks-cluster-managed-with-addons.yaml | envsubst | eksctl create cluster -f -
Wait until the command finishes and verify the results in CloudFormation.
Confirm kubectl is directed at the correct context:
kubectl config current-context
{your-email}@{your-cluster}.{your-region}.eksctl.io
Install the AWS Load Balancer Controller (use the image repository for the selected region based on this list), e.g.:
helm repo add eks https://aws.github.io/eks-charts
helm repo update
helm install aws-load-balancer-controller eks/aws-load-balancer-controller \
    -n kube-system \
    --set clusterName=$AWS_CLUSTER_NAME \
    --set serviceAccount.create=false \
    --set serviceAccount.name=aws-load-balancer-controller \
    --set image.repository=602401143452.dkr.ecr.eu-west-3.amazonaws.com/amazon/aws-load-balancer-controller
Cluster verification
To make sure the cluster is correctly configured you can run the following commands:
- Check if your cluster is accessible using eksctl:
eksctl get cluster --region $AWS_REGION --name $AWS_CLUSTER_NAME -o yaml
The cluster status should be ACTIVE.
- Verify that the OIDC issuer is configured, e.g.:
Identity:
  Oidc:
    Issuer: https://oidc.eks.eu-west-3.amazonaws.com/id/0A6729247C19177211F7EE71E85F9F50
- Check if the add-ons are installed on your cluster:
eksctl get addons --region $AWS_REGION --cluster $AWS_CLUSTER_NAME -o yaml
There should be 2 add-ons and their status should be ACTIVE.
Install Istio
Minimum Requirements:
- Istio version
1.18.x - DNS pre-configured with corresponding certificate for TLS
- Istio Gateway configured
- MQTT Port (
8883) open
Update the Istio configuration for it to work with the AWS LB controller:
- Debian/Ubuntu
- Windows
- MacOS
sed -ri '/replicaCount:/{n;s#(^\s+)(service:)#\1serviceAnnotations:\n\1 service.beta.kubernetes.io/aws-load-balancer-scheme: internet-facing\n\1 service.beta.kubernetes.io/aws-load-balancer-type: nlb\n\1\2#}' ./setup/istio.yaml
sed -ri '/replicaCount:/{n;s#(^\s+)(service:)#\1serviceAnnotations:\n\1 service.beta.kubernetes.io/aws-load-balancer-scheme: internet-facing\n\1 service.beta.kubernetes.io/aws-load-balancer-type: nlb\n\1\2#}' ./setup/istio.yaml
gsed -ri '/replicaCount:/{n;s#(^\s+)(service:)#\1serviceAnnotations:\n\1 service.beta.kubernetes.io/aws-load-balancer-scheme: internet-facing\n\1 service.beta.kubernetes.io/aws-load-balancer-type: nlb\n\1\2#}' ./setup/istio.yaml
Install Istio:
curl -L https://istio.io/downloadIstio | ISTIO_VERSION=1.18.5 sh -
cd istio-1.18.5
cat ../setup/istio.yaml | envsubst | ./bin/istioctl install -y -f -
If you received an error in the last step referring to port 8080, the most likely cause is not having your Kubernetes services running on your host machine.
Install Istio Socket Options
kubectl -n istio-system apply -f ../setup/ingress-gateway-socket-options.yaml
Install Istio Gateway
kubectl -n istio-system apply -f ../setup/gateway.yaml
cd ../
Configure Domain and Elastic Load Balancer
Check the ELB (Elastic Load Balancer) address for the just created service and export it for later use:
export AWS_ELB_DOMAIN=$(kubectl -n istio-system get svc istio-ingressgateway --template '{{(index .status.loadBalancer.ingress 0).hostname}}')
echo $AWS_ELB_DOMAIN
It might take some time before the load balancer is provisioned. If the command above shows an error, try again a moment later.
Option 1: Using a custom domain
Modify your DNS zone by adding a CNAME entry for your domain pointing to the ELB address displayed in the previous step.
Option 2: Use Global Accelerator with a public IP address or subdomain provided by AWS
Configure a Global Accelerator in front of the ELB.
Make sure to add all the necessary ports (80, 443, 1883, 8883), pick the correct region and select the ELB
that was just created.
When the accelerator is ready, public IP addresses and a domain issued by AWS will be available. The selected one has to be set in the environment:
one of the public IPs:
export DOMAIN="<IP address from the global accelerator>"the domain:
export DOMAIN="<domain of the global accelerator>"
Install ARCloud
Install Certificate Manager
This part is only required if you plan on using a custom domain with a TLS certificate.
For local deployments or when using an IP address only, it can be skipped.
export CERT_MANAGER_VERSION=1.9.1
helm upgrade --install --wait --repo https://charts.jetstack.io cert-manager cert-manager \
    --version ${CERT_MANAGER_VERSION} \
    --create-namespace \
    --namespace cert-manager \
    --set installCRDs=true
kubectl -n istio-system apply -f ./setup/issuer.yaml
cat ./setup/certificate.yaml | envsubst | kubectl -n istio-system apply -f -
Create K8s Namespace
kubectl create namespace ${NAMESPACE}
kubectl label namespace ${NAMESPACE} istio-injection=enabled
kubectl label namespace ${NAMESPACE} pod-security.kubernetes.io/audit=baseline pod-security.kubernetes.io/audit-version=v1.25 pod-security.kubernetes.io/warn=baseline pod-security.kubernetes.io/warn-version=v1.25
Create Container Registry Secret
kubectl --namespace ${NAMESPACE} delete secret container-registry --ignore-not-found
kubectl --namespace ${NAMESPACE} create secret docker-registry container-registry \
    --docker-server=${REGISTRY_SERVER} \
    --docker-username=${REGISTRY_USERNAME} \
    --docker-password=${REGISTRY_PASSWORD}
Setup AR Cloud
If you do not have a custom domain and would like to use an IP address instead, add the --no-secure flag to the
command below and make sure that the domain environment variable is set correctly:
export DOMAIN="<IP address from the cloud provider>"
This is heavily discouraged for publicly accessible deployments.
./setup.sh \
    --set global.domain=${DOMAIN} \
    --no-observability \
    --accept-sla
Passing the --accept-sla flag assumes the acceptance of the Magic Leap 2 Software License Agreement.
Verify Installation
Once the AR Cloud deployment completes, the deployment script will print out the cluster information similar to:
------------------------------
Cluster Installation (arcloud)
------------------------------

Enterprise Web:
--------------

https://<DOMAIN>/

Username: aradmin
Password: <base64-encoded string>

Keycloak:
---------

https://<DOMAIN>/auth/

Username: admin
Password: <base64-encoded string>

MinIO:
------

kubectl -n arcloud port-forward svc/minio 8082:81
https://127.0.0.1:8082/

Username: <base64-encoded string>
Password: <base64-encoded string>

PostgreSQL:
------

kubectl -n arcloud port-forward svc/postgresql 5432:5432
psql -h 127.0.0.1 -p 5432 -U postgres -W

Username: postgres
Password: <base64-encoded string>

Network:
--------
NAMESPACE      NAME                   TYPE           CLUSTER-IP        EXTERNAL-IP PORT(S)                                                        AGE
istio-system   istio-ingressgateway   LoadBalancer   <IPv4>   <IPv4>   80:31456/TCP,443:32737/TCP,15021:31254/TCP,1883:30231/TCP,8883:32740/TCP    1d
Log in to the Enterprise Console
- Open the Enterprise Console URL (
https://<DOMAIN>/) in a browser - Enter the credentials for Enterprise Web provided by the deployment script
- Verify the successful login
Register an ML2 device
Web console
Perform the following steps using the web-based console:
- Log in to the Enterprise Console
- Select Devices from the top menu
- Click Configure to display a QR code unique for your AR Cloud instance
ML2 device
Perform the following steps from within your ML2 device:
- Open the Settings app
- Select Perception
- Select the QR code icon next to AR Cloud
- Scan the QR code displayed in the web console
- Wait for the process to finish and click on the Login button
- Enter the user account credentials in the ML2 device web browser
The Enterprise Console should show the registered device on the list.
Manage Cluster Scaling
In case the cluster is not needed, the auto scaling group for the cluster nodes can be scaled down to 0 and later scaled up again. This allows to decrease the costs of the infrastructure by only having the cluster nodes running when the cluster is actually being used.
Find the name of the auto scaling group associated with the cluster:
aws autoscaling describe-auto-scaling-groups --filters "Name=tag:eks:cluster-name,Values=$AWS_CLUSTER_NAME" --query 'AutoScalingGroups[].AutoScalingGroupName' --output text
Scale the nodes down to 0 using the name of the auto scaling group:
aws autoscaling update-auto-scaling-group \
    --auto-scaling-group-name <asg-name> \
    --desired-capacity 0 \
    --min-size 0 \
    --max-size 0
Scale the nodes up again using the name of the auto scaling group:
aws autoscaling update-auto-scaling-group \
    --auto-scaling-group-name <asg-name> \
    --desired-capacity 4 \
    --min-size 2 \
    --max-size 8
Maintenance
Upgrade AR Cloud
AR Cloud can be easily upgraded by following the steps below:
- Download a newer release from Github.
- Set all the environment variables for AR Cloud and your AWS account that were used during the initial installation.
- Run the setup script again to upgrade the services automatically.
Upgrade the Kubernetes Cluster
Follow the official AWS documentation to upgrade your Kubernetes cluster to a newer version.
Rotate Credentials
All credentials are automatically generated during the installation process and stored in Kubernetes secrets. To rotate them, new secrets have to be created and then replaced in the Helm values used by AR Cloud.
The postgresql and nats secrets all use the same keys for the credentials:
usernamepassword
The object storage secrets use the following keys for the credentials:
accesskeysecretkey
In case an external database or object storage are used, the process might differ for each of these services, but AR Cloud still uses secrets to read the current credentials, so they should be adjusted accordingly.
Make sure you use unique names for the new secrets, so that they do not overwrite the existing ones.
Generate new secrets for the selected service and account, e.g.:
apiVersion: v1
kind: Secret
metadata:
  name: db-mapping-20231003
type: Opaque
data:
  username: base64-encoded-username
  password: base64-encoded-password
---
...
Create the new secrets inside the cluster, e.g.:
kubectl -n arcloud apply -f /path/to/my-new-secrets.yamlUpdate the
existingSecretvalues and provide the names of the created secrets in thevalues.yamlfile bundled with the AR Cloud release, e.g.:...
postgresql:
users:
- username: mapping
password: ""
existingSecret: "db-mapping-20231003"
database: arcloud
role: connect
...Follow the procedure above to reinstall the AR Cloud services to use the new secrets.
Manage AWS Quotas
Each AWS account has default quotas for all the available services. In case of problems related to exceeding these quotas, please refer to the documentation about checking or increasing them for your account.
Check Object Storage Usage
In case the bundled minio service is running inside the cluster, it is possible to easily verify the used of the main
bucket used by AR Cloud.
Create a
minio-client-job.yamlfile with the following contents:apiVersion: batch/v1
kind: Job
metadata:
name: minio-disk-usage
namespace: arcloud
spec:
parallelism: 1
backoffLimit: 1
completions: 1
ttlSecondsAfterFinished: 100
template:
spec:
containers:
- args:
- -c
- |
mc config host add my-alias http://minio:81 "$MINIO_ROOT_USER" "$MINIO_ROOT_PASSWORD";
mc du -d 2 my-alias/arcloud;
curl -sSX POST $ISTIO_QUIT_API/quitquitquit
command:
- /bin/bash
env:
- name: MINIO_ROOT_USER
valueFrom:
secretKeyRef:
key: accesskey
name: minio
- name: MINIO_ROOT_PASSWORD
valueFrom:
secretKeyRef:
key: secretkey
name: minio
- name: ISTIO_QUIT_API
value: http://127.0.0.1:15020
image: minio/mc
imagePullPolicy: IfNotPresent
name: mc
restartPolicy: NeverRun the following command to create a job, log in to the storage service and check the disk usage of the arcloud bucket:
kubectl apply -f minio-client-job.yaml; kubectl wait --for=condition=complete -n arcloud job/minio-disk-usage --timeout=60s; kubectl logs -n arcloud job/minio-disk-usage -c mcThe output should look like this:
job.batch/minio-disk-usage created
job.batch/minio-disk-usage condition met
Added `my-alias` successfully.
876MiB  124 objects     arcloud/canonical-maps
263MiB  704 objects     arcloud/dense-meshes
29MiB   150 objects     arcloud/sensor-data
2.1GiB  3301 objects    arcloud/support
109MiB  16 objects      arcloud/tracking-maps
3.4GiB  4295 objects    arcloud
Copy the output and send it to Magic Leap support for analysis.
Troubleshooting
Status Page
Once deployed, you can use the Enterprise Console to check the status of each AR Cloud service. This page can be accessed in the navigation menu link "AR Cloud Status" or through the following URL path:
"<your domain / IP Address>"/ar-cloud-status
e.g.: http://192.198.0.0/ar-cloud-status
An external health check can be configured to monitor AR Cloud services with the following endpoints:
| Service | URL | Response |
|---|---|---|
| Health Check (General) | /api/identity/v1/healthcheck | {"status":"ok"} |
| Mapping | /api/mapping/v1/healthz | {"status":"up","version":"<version>"} |
| Session Manager | /session-manager/v1/healthz | {"status":"up","version":"<version>"} |
| Streaming | /streaming/v1/healthz | {"status":"up","version":"<version>"} |
| Spatial Anchors | /spatial-anchors/v1/healthz | {"status":"up","version":"<version>"} |
| User Identity | /identity/v1/healthz | {"status":"up","version":"<version>"} |
| Device Gateway | /device-gateway/v1/healthz | {"status":"up","version":"<version>"} |
| Events | /events/v1/healthz | {"status":"up","version":"<version>"} |
Run the setup script in debug mode
In some cases additional information might help finding the cause of issues with the installation. The setup script can
be run with in debug mode by adding the --debug flag, e.g.
./setup.sh \
    --set global.domain=${DOMAIN} \
    --no-observability \
    --accept-sla \
    --debug
Show the installation information again
In case access credentials to the Enterprise Console or one of the bundled services is needed, the information shown at the end of the installation process can be printed again whenever needed:
./setup.sh --accept-sla --installation-info
Services are unable to start, because one of the volumes is full
If one of the Stateful Sets using persistent volumes (nats, minio, postgresql) is unable to run correctly, it might mean
the volume is full and needs to be resized.
Using minio as an example, follow the steps to resize the data-minio-0 persistent volume claim:
Allow volume resizing for the default storage class:
kubectl patch sc gp2 -p '{"allowVolumeExpansion": true}'Resize the
miniovolume:kubectl patch pvc data-minio-0 -n arcloud -p '{"spec":{"resources":{"requests":{"storage":"100Gi"}}}}'Track the progress of the resize operation (it will not succeed if there are no nodes available in the cluster):
kubectl get events -n arcloud --field-selector involvedObject.name=data-minio-0 -wVerify that the new size is visible:
kubectl get pvc -n arcloud data-minio-0Make sure the pod is running:
kubectl get pod -n arcloud minio-0Check the disk usage of the volume on a running pod:
kubectl exec -n arcloud minio-0 -c minio -- df -h /data
Unable to complete the installation of the cluster services
Reinitialize the database in case of earlier errors installing postgresql.
This might happen when the database deployment was reinstalled, but the database itself has not been updated. Usually
this can be detected by the installation failing when installing keycloak. It is caused by the passwords in the secrets
not matching the ones for the users in the database.
This will remove all the data in the database!
In case the problem occurred during the initial installation, it is okay to proceed. Otherwise, please contact Magic Leap support to make sure none of your data is lost.
Uninstall
postgresql:helm uninstall -n arcloud postgresqlDelete the persistent volume for the database:
kubectl delete pvc -n arcloud data-postgresql-0Run the installation again using the process described above.
Problems accessing the Enterprise Console
Some content might have been cached in your web browser.
Open the developer console and disable cache (that way everything gets refreshed):
- Chrome (Disable cache):
- Firefox (Disable HTTP Cache): https://firefox-source-docs.mozilla.org/devtools-user/settings/index.html
Alternatively, use a guest/separate user profile:
- Chrome: https://support.google.com/chrome/answer/6130773
- Firefox: https://support.mozilla.org/en-US/kb/profile-manager-create-remove-switch-firefox-profiles
Support
In case you need help, please: