Action Bindings
Overview
Action bindings map key, mouse, and gamepad input to actions that manipulate an object in the virtual room and generate corresponding events. For instance, if the object is a hand, you can use the left-arrow key to move the hand to the left, which generates events in the Application Simulator system that your application would see through the MLHandTracking API as a change in hand position toward the left.
Examples of actions include:
- move-left/right
- rotate (pitch, yaw, roll)
- eye blink
- trigger-OK-gesture
Examples of objects, also known as targets, include:
- Scene View camera (either free-fly camera or top-down camera)
- Head Pose (also known as Device View camera)
- Control
- Right Hand
- Left Hand
- Eye Gaze
The Application Simulator defines a set of bindings for common actions, primarily movement and rotation, which manipulate one of the targets above. The target being manipulated is called the active target.
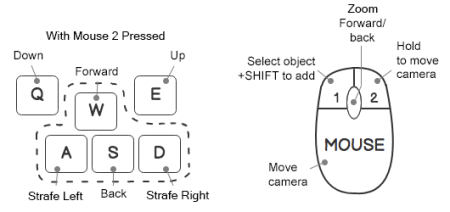
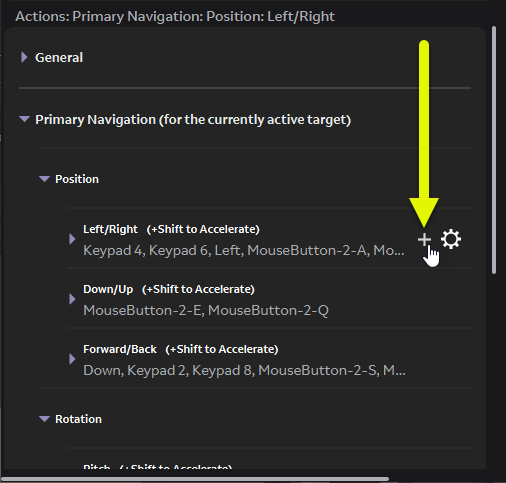
Here’s an illustration of default bindings for the Primary Navigation actions. Please refer to the default bindings tables at the end of this page for more.
If you want to use a gamepad as input, be sure to connect it to your computer. The Application Simulator remembers bindings for the gamepad if it is disconnected.
Action Focus Areas
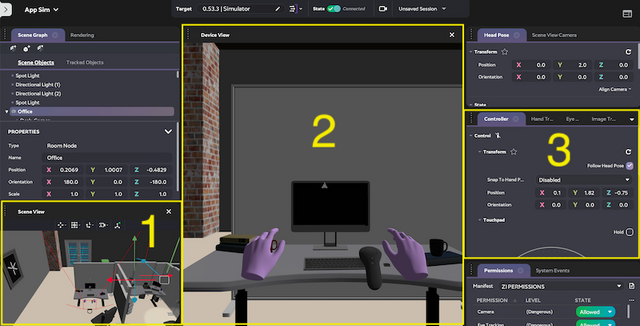
In order for keyboard action bindings to work, one of the following three areas (called Action Focus Areas) in the Application Simulator window must have the input focus. Gamepad inputs will always work regardless of the focus area:
- Scene View
- Device View
- Touchpad in Control Panel
We suggest that you change focus to the Scene View or Device View using the secondary mouse button (usually the right button). The primary mouse button works too but it will likely change the selected object in the view, which may not be what you want.
Active Target Selection
When the Scene View, Device View, or Control's Touchpad area receives input focus, they automatically switch the active target to the Scene View Camera, Head Pose, or Control, respectively.
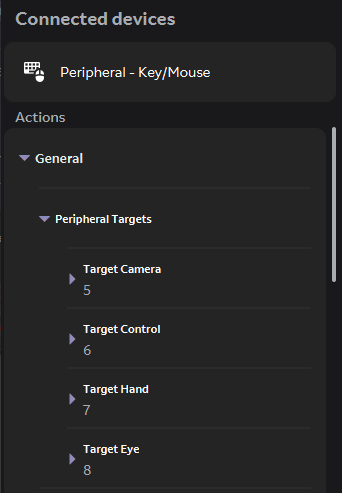
Another target can be selected as the active target using shortcut keys when an action focus area has the focus. The Application Simulator provides default shortcut keys to change the active target:
| Key | Select Target |
|---|---|
| 5 | select and toggle between scene view camera and head pose |
| 6 | select control |
| 7 | select and toggle between left hand and right hand |
| 8 | select eye gaze |
Another way to change the active target is to use the navigation target dropdown menu.
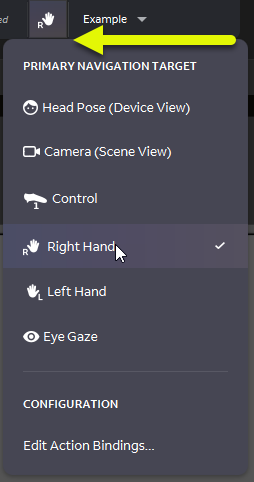
After you select the active target from the dropdown menu, in order to use keyboard inputs, you need to click on one of the action focus areas (see Action Focus Area section above).
Only the first choice of action focus area will preserve the active target. If you click on another area, the corresponding target (Scene View Camera or Head Pose or Control) becomes the active target as usual.
Open Bindings
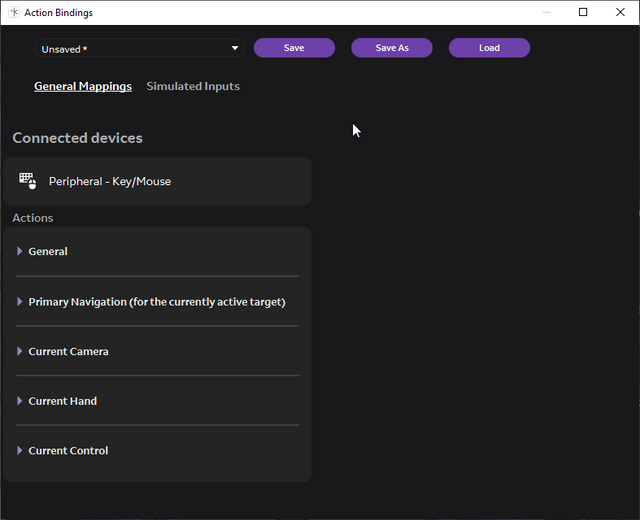
The Action Bindings window lets you view and change which input is mapped to which action.
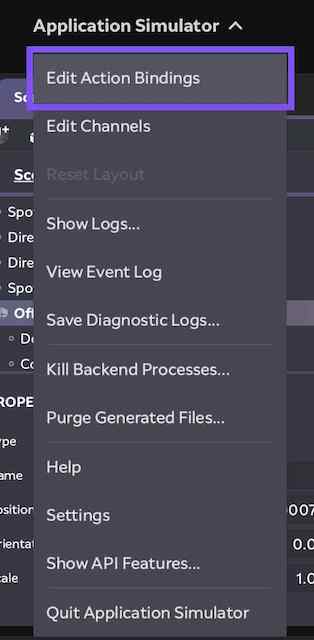
Click the Application Simulator dropdown menu on the top left corner of the window.
Click Edit Action Bindings.
The Action Bindings window (namely the Action Binding Editor) appears, which shows current action bindings and lets you edit them.
Action Levels
There are three levels of actions depending on their commonality.
Level 1 Actions: These actions are the common actions that apply to all types of targets. They act upon the active target. The Primary Navigation section in the editor window defines bindings for level 1 actions. Please see the following Primary Navigation section for more.
Level 2 Actions: These actions are common to one type of target, e.g. hand. Examples include actions for triggering a gesture of a hand in addition to those to move or rotate a hand. You need to select which hand, left or right, is the active target. The Current Camera, Current Hand, and Current Control sections in Action Bindings define bindings for level 2 actions. Note that the scene view camera and head pose (aka Device View camera) belong to the type of “camera”.
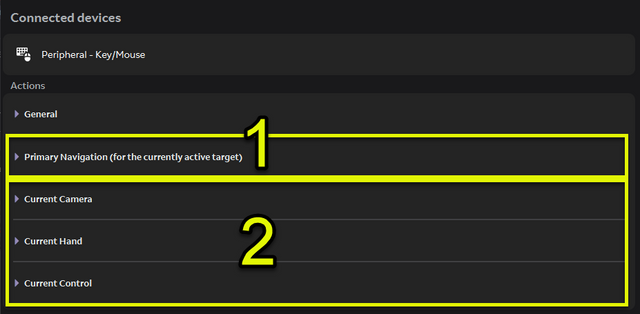
For example, you can define key “L” to move the control left.
- Level 3 Actions: These actions apply to one specific target, for example left hand, or scene view camera, regardless of the active target. All sections in the Scene View define bindings for level 3 actions.
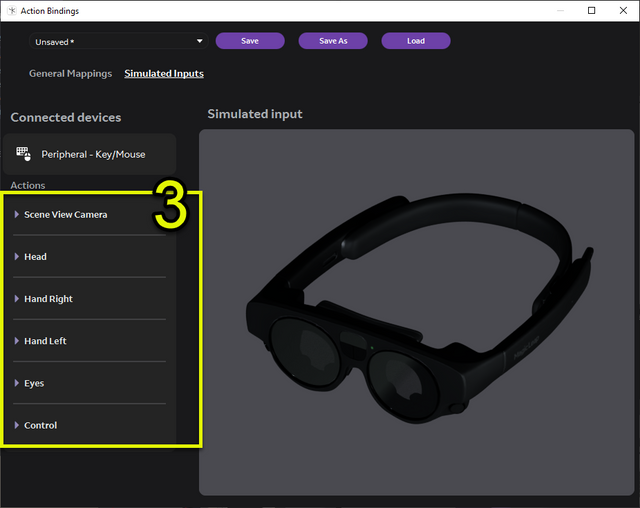
For example, you can define key “M” to roll the left hand, or define key “K” to trigger the OK gesture of the right hand.
General Section
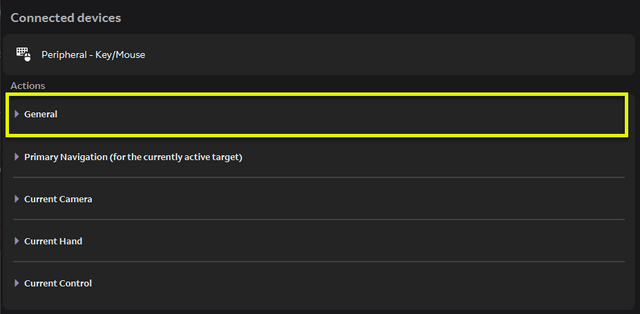
The General section in the Action Bindings window defines miscellaneous action bindings. For instance, it defines bindings for selecting the active target:
Edit an Action Binding
Go to the action binding you want to change.
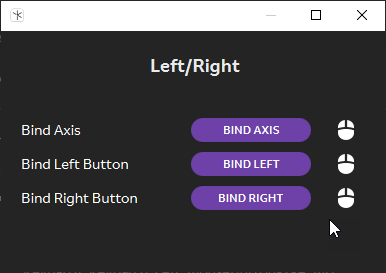
- To add a new binding, click + and use the Dialog Box.
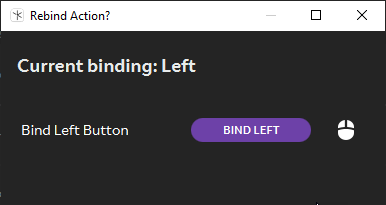
Then you should see the following dialog:
- To change an existing binding, double-click the existing binding.
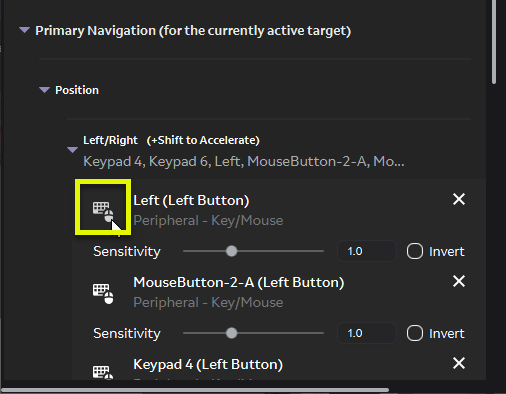
Then you should see the following dialog:
To Bind a Gamepad Stick
- Click the mouse icon.
- From the drop-down menu, select the mouse button or movement type you want to bind to this action. Any modifier keys can be selected from this menu as well.
- To cancel changing an action binding, press Esc.
Reset Bindings
Click Reset on the group menu to restore a group of action bindings to their default settings.
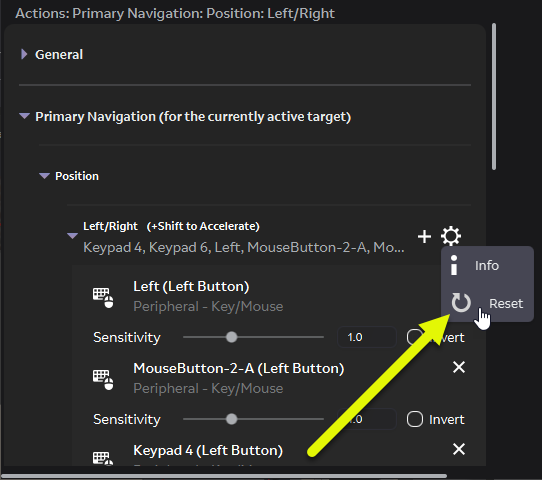
To restore action bindings of a category to default, click the Reset button for that category.

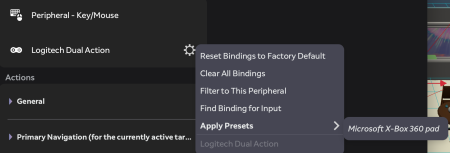
To restore action bindings of a device (for example, all of keyboard/mouse), click the Settings icon next to the device and choose Reset Bindings to Factory Default:

Setting Deadzone and Sensitivity
The settings for sensitivity and deadzone can be changed for binding when applicable.
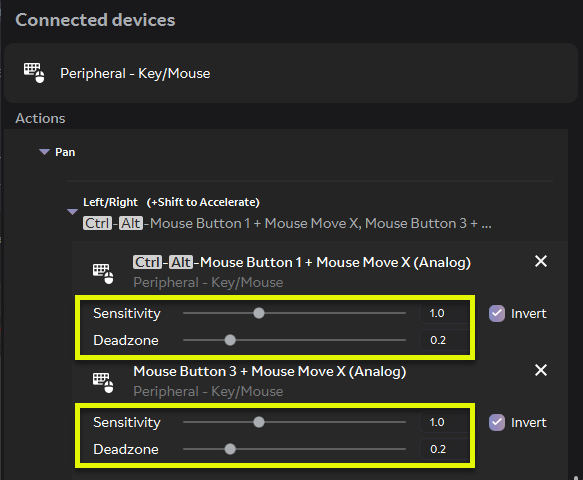
The default settings for deadzone and sensitivity can be changed globally for a device from the main window under Settings > Application Simulator > Peripherals.
Saving Action Bindings
Currently, defined action bindings can be saved and loaded at a later time. Action bindings are saved as .mlscheme files.

The Save command is enabled if you have unsaved changes to the current set of action bindings.
Context Menus
Input Device Context Menu
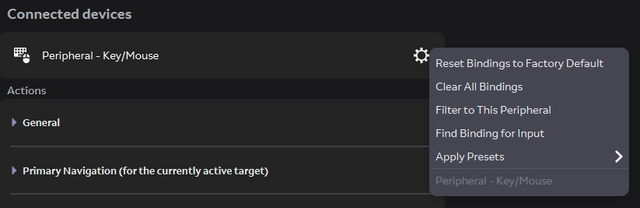
- Reset Bindings to Factory Default Reset: Resets input binding for the device to factory defaults.
- Clear All Bindings: Deletes all input bindings for the device.
- Filter to This Peripheral: Displays actions bound to input from the device.
- Find Binding for Input: Lets the user discover which actions are bound to a given input. While active, the device selector highlights and continuously scans the device for inputs. Trigger keyboard or mouse inputs (for the "Peripheral - Key/Mouse" device) or a connected controller (for other devices). The highlighted area shows the detected inputs and which actions are bound to it. Click Stop Showing Inputs to end the scan.

Invoke any input from keyboard/mouse/gamepad, and the entity shows which action is bound to it.
- Apply Presets: Allows you to apply a set of predefined bindings to the device. This is especially useful for a gamepad – for example with a Logitech gamepad connected, the command allows you to bind its input with common bindings of a Microsoft XBox 360 Pad.
Default Gamepad Bindings
The following are the default action bindings when a USB gamepad is connected.
Movement Controls
| Gamepad input | Simulated action |
|---|---|
| D-pad Left/Right | Moves the Control along its X-axis (left/right) |
| D-pad Up/Down | Moves the Control along its Z-axis (forwards/back) |
| Left Trigger | Rotates the Control along its X-axis (pitch) |
| Right Trigger | Rotates the Control along its Y-axis (yaw) |
| B button | Resets the Control position and orientation |
| A button | Touchpad Tap gesture |
Head Pose
| Gamepad input | Simulated action |
|---|---|
| Left Stick Left/Right | Moves head pose along the X-axis (left/right) |
| Left Stick Up/Down | Moves head pose along the Z-axis (forwards/back) |
| Right Stick Left/Right | Rotates head pose along the X-axis (yaw) |
| Right Stick Up/Down | Rotates head pose along the Y-axis (pitch) |
| Back button | Resets head pose |
| Y button | Toggles between relative and absolute movement |
Simulating Gestures
| Gamepad input | Simulated action |
|---|---|
| Left bumper | Left thumbs up gesture |
| Right bumper | Right thumbs up gesture |
Default Keyboard Bindings for the Scene View
The following are the default action bindings when a keyboard and mouse are connected.
Tools Mode
| Key | Simulates this action |
|---|---|
| Q | No manipulation mode |
| W | Move manipulation mode |
| E | Rotate manipulation mode |
| R | Scale manipulation mode |
| 2 or C | Top Down/ Fly cam toggle |
| Z | Pivot/Center toggle |
| X | Local/World toggle |
| F | Moves pivot point to the selection and the camera moves the same amount, maintains camera orientation towards pivot point |
| G | Moves pivot point to the selection and rotates the camera towards the selection |
| Left Mouse Drag | Screen space camera and pivot point pan |
| Middle Mouse Wheel | Moves camera closer to pivot point |
| Alt + left mouse drag | Pivot point orbit |
| Middle Mouse Drag | Screen space camera and pivot point pan |
| Ctrl + Alt + Left Mouse Drag | Pivot zoom |
| Shift | Accelerate key |
Fly Cam Mode
Press the listed mapping and the right-mouse button for the following.
| Key | Simulates this action |
|---|---|
| Right Mouse Drag | Rotate camera and pivot point |
| W or up arrow | Move camera and pivot point forward |
| S or down arrow | Move camera and pivot point back |
| A or left arrow | Move camera and pivot point left |
| D or right arrow | Move camera and pivot point right |
| Q | Move camera and pivot point up |
| Alt + W | Rotate camera pitch up |
| Alt + S | Rotate camera pitch down |
| Alt + A | Rotate camera yaw left - world Y-axis |
| Alt + D | Rotate camera yaw right - world Y-axis |
| Alt + Q | Rotate camera yaw left - world Y-axis |
| Alt + E | Rotate camera yaw right - world Y-axis |
| E | Move camera and pivot point Down |
| F | Moves pivot point to selection and camera moves same amount, maintains camera orientation towards pivot point |
| G | Moves pivot point to selection and rotates camera towards selection |
| 2 or C | Top down/ Fly cam toggle |
| Middle Mouse Wheel | Moves camera closer to pivot point |
| Alt + Right Mouse Drag | Pivot zoom |
| Shift key | Accelerate key |
Top Down Camera Mode
These control the Top Down/Fly Cam camera
| Key | Simulates this action |
|---|---|
| W or up arrow | Move camera North (Up - Z axis) |
| S or down arrow | Move camera South (Down - Z axis) |
| A or left arrow | Move camera West (Left - X axis) |
| D or right arrow | Move camera East (Right - X axis) |
| F | Moves pivot point to selection and camera moves same amount, maintains camera orientation towards pivot point |
| Middle Mouse Wheel | Move Camera forward/back (with a limit at Y = 0) |
| Left mouse drag | XZ Plane Camera Pan |
| Shift key | Accelerate key |
Default Keyboard Bindings for the Device View
The following are the default action bindings when a keyboard and mouse are connected.
| Key | Simulates this action |
|---|---|
| Shift key | Accelerate mappings (3x sensitivity) |
| Alt + W | Rotate headpose pitch up |
| Alt + S | Rotate headpose pitch down |
| Alt + A | Rotate headpose yaw left - world Y-axis |
| Alt + D | Rotate headpose yaw right - world Y-axis |
| Alt + Q | Rotate headpose yaw left - world Y-axis |
| Alt + E | Rotate headpose yaw right - world Y-axis |
| Middle mouse wheel Y | Zoom |
| Middle mouse wheel X | Zoom x3 faster |
| Right mouse drag | Rotate headpose |