Application Simulator Plug-in for Unity Editor
This section describes how to configure your Unity Project settings so that you can test your application inside the Magic Leap App simulator plug-in for the Unity Editor.
The Magic Leap App Simulator is no longer being developed or supported. The package only works when using the XR workflow and a Magic Leap Unity SDK version prior to version 2.0.0.
If you want to use the Magic Leap Application Simulator through the Magic Leap Hub instead, please see Application Simulator.
Graphics Compatibility for Application Simulator for Unity Package
The following graphics APIs are compatible when running the Magic Leap Application Simulator for Unity, directly inside the Unity Editor.
| OpenGL | Vulkan | Metal | |
|---|---|---|---|
| Windows 10/11 | ✓ | ||
| macOS (Intel) | ✓ | ||
| macOS (M1) | ✓ |
Beginning with Magic Leap Unity SDK package version 2.0.0, the Magic Leap Application Simulator for Unity package will be officially deprecated. This decision comes as a response to community feedback and our ongoing effort to improve the developer experience.
Application Simulator will continue to be accessible to Unity developers through the Magic Leap Hub module.
The Application Simulator for Unity is an offering that is separate, but related to the Application Simulator. Previously, it was recommended to use the Application Simulator through the Magic Leap Hub (ML Hub), but due to performance and compatibility reasons, it is now recommended that you follow the steps outlined on this page rather than starting the Application Simulator in the ML Hub, switching to Unity, and clicking Play.
Application Simulator can now be used from within Unity as a native plugin without having to open ML Hub. This is enabled using the Magic Leap Application Simulator for Unity package.
This package still requires that both the ML Hub and Application Simulator Runtime are installed.
System Requirements
System Requirements for the Application Simulator
Prerequisites
Downloading Application Simulator for Unity
- Start the ML Hub, open the Package Manager, and go to the All tab.
- Select the latest version of the Magic Leap Application Simulator for Unity, and click on the Download button.
- Click on Apply Changes.
After installing the package, search for it in the Package Manager, and click on Open Folder. This will help you with the next step of the process.
Installing Application Simulator for Unity
- In Unity, go to Window > Package Manager, then click on the + icon and select Install Package from Tarball.
- Navigate to where the package is located, and open the
com.magicleap.appsim.tgzfile.
- After a quick installation, the package should now be visible under the name Magic Leap Application Simulator in the Package Manager.
Make sure you select Install package from Tarball, as otherwise, you will fail to find the package.
Running Application Simulator for Unity
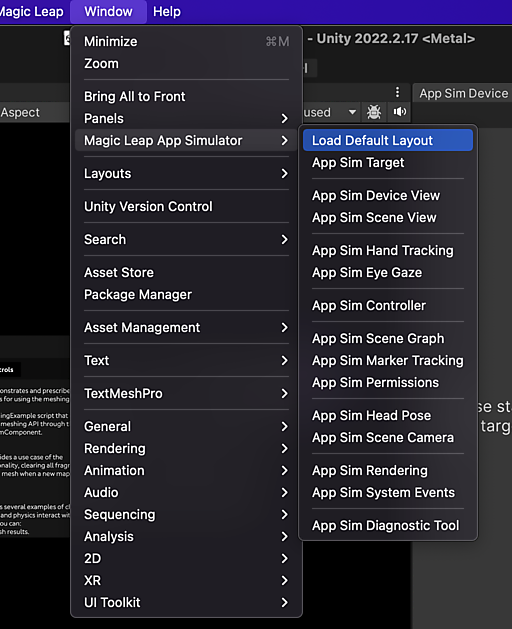
A new Magic Leap menu will now appear under Unity's Windows tab. If you do not see it, restart the Unity editor.
- Go to Windows > Magic Leap Application Simulator > Load Default Layout.

- The Target Selector panel will now appear in the upper-left portion of your Unity editor. You can now select your Target.
- Click on the Play button next to your Target.
With the Application Simulator for Unity, there are now two identical-in-appearance "Play" buttons. One is for selecting your Target and the other for playing your Scene.
- Click on the Play button in the top-center of the Unity editor window.
Once a new session has been started, you should now be able to use the Application Simulator from within the Unity editor.
Arranging the Workspace
From the same dropdown menu, you can open panels with other Application Simulator tabs, such as Device View, Hand Tracking, and more.
Those panels offer the same functionalities as other Unity Editor panels — they can be positioned, scaled, arranged, and docked to your workspace to suit your preferences.