Getting Started With Unreal Engine
Unreal Engine 5 allows you to create applications for Magic Leap 2 devices using OpenXR APIs. To build Unreal Applications for Magic Leap 2 developers will need to compile Unreal Engine from source the fork for MagicLeap 2. This fork enables developers to build Magic Leap 2 applications with Unreal Engine.
Remote Render and Unreal Engine
Remote Render allows you to run apps created for the desktop and stream them to Magic Leap 2 devices.
Starting with Magic Leap 2 Unreal SDK version 1.3.0, you can use either the unmodified version of Unreal Engine or the Unreal Engine source code to create OpenXR Apps that are compatible with Remote Render.
For detailed instructions on setting up Magic Leap Remote Rendering and using it with Unreal Engine 5, refer to theRemote Rendering service and Remote Rendering with Unreal Engine 5 guides.
Applications created with unmodified Unreal Engine binary cannot be run directly on Magic Leap 2 devices. To package apps for direct execution on Magic Leap 2 devices, you must follow this guide to build Unreal Engine source code from the repository.
Prerequisites
- This release is supported only on Windows.
- A GitHub account and an Epic Games account.
- Visual Studio 2022
Building Unreal Engine from source code can take several hours or more.
System Requirements
For detailed system requirements, refer to Hardware and Software Requirements in the Unreal Engine 5 documentation.
Visual Studio
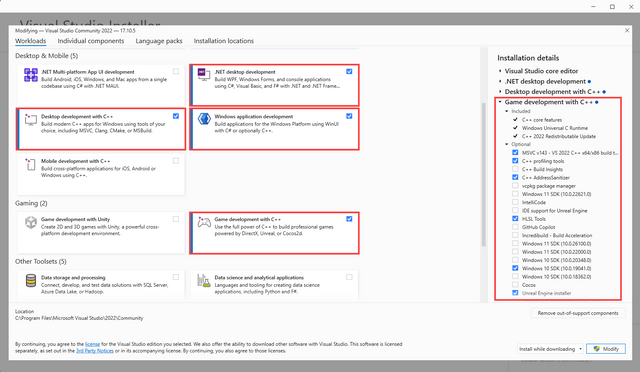
Install Visual Studio 2022.
During installation, select the following workloads and components:
Workloads:
- Desktop development with C++
- Game development with C++
- .NET desktop development
- Universal Windows Platform development
Game development with C++ optional components:
- C++ profiling tools
- C++ AddressSanitizer
- HSL Tools
- Windows 10 SDK (10.0.18362.0 or later)
- Unreal Engine installer
For more detailed instructions, refer to Unreal Engine's Setting Up Visual Studio documentation.
Access Unreal Engine Repository
To get access to the Epic Games Unreal Engine GitHub repository, follow the instructions here: Accessing Unreal Engine source code on GitHub.
Clone the Magic Leap Unreal Engine Fork
In this section, you will download the Unreal Engine source code from the Magic Leap fork of the Epic Games GitHub repository. This involves cloning the repository to your local machine.
Log in to GitHub:
- Open your web browser and go to GitHub.
- Log in with your GitHub account credentials that have access to the Unreal Engine source code.
Open Command Prompt:
- Press
Win + R, typecmd, and pressEnterto launch Command Prompt.
- Press
Set the Destination Directory:
- Decide where you want to clone the Unreal Engine repository.
- Use the
cdcommand to navigate to your chosen directory. For example to navigate to the Documents folder:cd Documents
Clone the Repository:
- Run the following command to clone the repository:
git clone --single-branch https://github.com/MagicLeapUnreal/UnrealEngine.git
- Run the following command to clone the repository:
The --single-branch argument is optional and reduces the download size by pulling only the specified branch.
This guide will refer to the folder that contains the Unreal Engine Source Code as [UERoot].
Switching to Another Branch after cloning using `--single-branch`
If you used the --single-branch argument and then want to switch to a different branch, you can update the repositories origin using the following steps:
If you need to work with a different branch or update the existing branch list:
Navigate to the Repository Directory:
- Ensure you are in the repository directory by running
cdfollowed by the path to the folder that contains the Unreal Engine source code:cd [UERoot]
- Ensure you are in the repository directory by running
Configure Repository to Fetch All Branches:
- Update the configuration to fetch all branches:
git config remote.origin.fetch "+refs/heads/*:refs/remotes/origin/*"
git fetch --all
- Update the configuration to fetch all branches:
Switch to Another Branch:
- To switch to a specific branch, use:
git checkout branch-name - Replace
branch-namewith the name of the branch you want to switch to.
- To switch to a specific branch, use:
Magic Leap Unreal Engine Plugin
This section provides instruction on how to add the Magic Leap Plugin to Unreal Engine before building Unreal Engine from source.
Download the Magic Leap C and Unreal packages
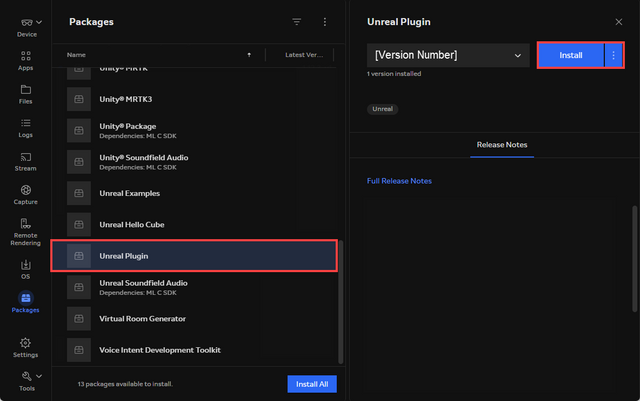
- Launch the Magic Leap Hub and select the Packages option from the sidebar.
- Select the Unreal Plugin package, then click Install.
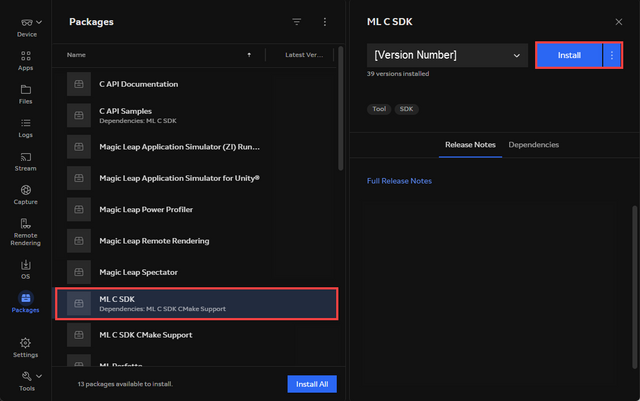
(Optional) Install MLSDK
The MLSDK and Environment Variable are only required if you wish to use MLSDK APIs such as Magic Leap Voice Intents in your project. Otherwise, you only need to download the Unreal plugin from the Magic Leap Hub.
Select the ML C SDK package, then click Install.
Set the
MLSDKenvironment variable to the download location:- By default the ML Hub will download the packages to
%USERPROFILE%\MagicLeap\mlsdk\ - Open Windows Settings and search for "environment".
- Choose Edit the system environment variables.
- In the System Properties dialog, click Environment Variables.
- Under User variables, click New.
- Name the variable
MLSDKand set the value to the location of the MLSDK :%USERPROFILE%\MagicLeap\mlsdk\<MLSDK_VERSION>\. - Click OK to close the dialogs.
- By default the ML Hub will download the packages to
Add the Magic Leap Plugin to Unreal
This section covers how to integrate the Magic Leap Unreal SDK plugins into your Unreal Engine setup.
Navigate to Plugins Directory:
- Open File Explorer and go to:
[UERoot]\Engine\Plugins\ - Create a new folder named
MagicLeapif it does not already exist.
- Open File Explorer and go to:
Locate Downloaded Plugins:
- Navigate to the directory where the Magic Leap plugins are stored, usually found in:
%USERPROFILE%\MagicLeap\tools\unreal\plugin\<version>\ - Copy the contents of the plugin folders.
- Navigate to the directory where the Magic Leap plugins are stored, usually found in:
Copy Magic Leap Plugins Folder into the Unreal Engine Directory:
- Copy the plugin folders and paste them into the
MagicLeapfolder you created in:
[UERoot]\Engine\Plugins\Runtime\- Copy the plugin folders and paste them into the
Install Android Dependencies
This section includes instructions on how to configure your environment to build Android Applications using Unreal Engine.
If you run into any issues building for the Android, see Epics's official documentation Engine for additional information.
OpenJDK-11
Download OpenJDK-11 from https://jdk.java.net/java-se-ri/11.
Extract the zip file and move the
jdk-11folder to your%USERPROFILE%directory.Set the
JAVA_HOMEenvironment variable:- Open Windows Settings and search for "environment".
- Choose Edit the system environment variables.
- In the System Properties dialog, click Environment Variables.
- Under System variables, click New.
- Name the variable
JAVA_HOMEand set the value to the path of thejdk-11folder. - Click OK to close the dialogs.
Android Studio (Electric Eel, 2022.1.1 Patch 2 or newer)
Download the installer from the Android Studio archive site.
Install Android Studio (Electric Eel 2022.1.1 Patch 2 or newer)
Start Android Studio and click More Actions > SDK Manager.
In the SDK Platforms tab, select Android SDK 10 (Q) API Level 29.
In the SDK Tools tab, select Show Package Details.
Install the following:
- Android NDK version 25.1.8937393
- Android SDK Command-line Tools 9.0
- CMake version 3.22.1
Click OK to install the selected packages and close the SDK Manager.
Complete Android Setup
This section explains how to modify the SetupAndroid.bat file to configure the correct SDK paths for Android platform requirements.
Navigate to Android Directory:
- Open File Explorer and go to:
[UERoot]\Engine\Extras\Android\
- Open File Explorer and go to:
Run SetupAndroid.bat:
Open Command Prompt and navigate to the script location:
cd [UERoot]\Engine\Extras\AndroidRun the script by typing:
./SetupAndroid.batThis script ensures that the correct version of the Android SDK is installed.
Building Unreal Engine
After pulling the Unreal Engine source code, build the engine using the instructions provided in Unreal Engine's official documentation on Building Unreal Engine From Source.
Open Command Prompt:
- Press
Win + R, typecmd, and pressEnter.
- Press
Navigate to Unreal Engine Root Directory:
- Navigate to the
[UERoot]directory that contains the source code.
- Navigate to the
Run Setup Script:
- Execute the
Setup.batfile to download required binaries and set up dependencies:./Setup.bat - This process might prompt you for additional installations or permissions. Follow the prompts to complete the setup.
- Execute the
Generate Project Files:
- After the setup completes, generate Visual Studio solution files:
./GenerateProjectFiles.bat - This command creates a
UE5.slnfile, which you will use to open the project in Visual Studio.
- After the setup completes, generate Visual Studio solution files:
All project files are intermediate ([UERoot]\Engine\Intermediate\ProjectFiles). You must generate project files each time you sync a new build to ensure they are up to date. If you delete your Intermediate folder, you must regenerate project files using the GenerateProjectFiles batch file.
Open Visual Studio:
- Launch Visual Studio from your Start menu or desktop shortcut.
Open UE5.sln:
- Click File > Open > Project/Solution.
- Navigate to the
[UERoot]directory and select theUE5.slnfile. - Click Open to load the project.
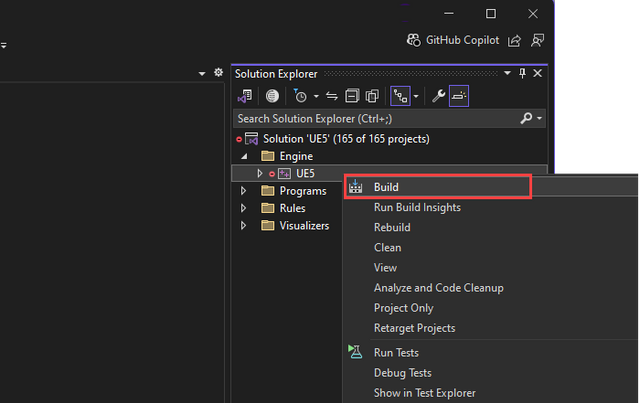
Build the Engine
- Set your solution configuration to Development Editor.
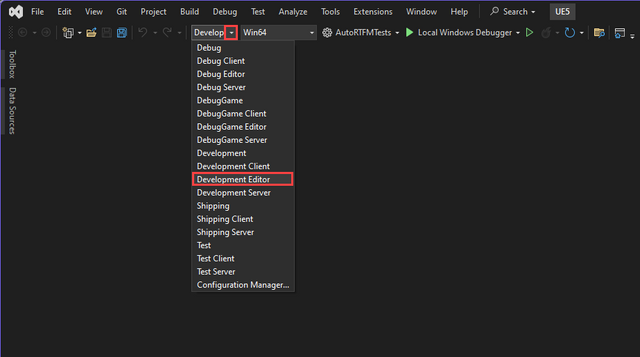
The default width of Visual Studio dropdowns is small, when selecting Development Editor in the Solution Configuration, the option might be truncated and read Develop instead.
- Set your solution platform to Win64.
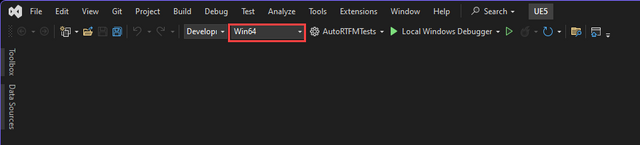
- Right-click the UE5 target and select Build.
Running the Editor
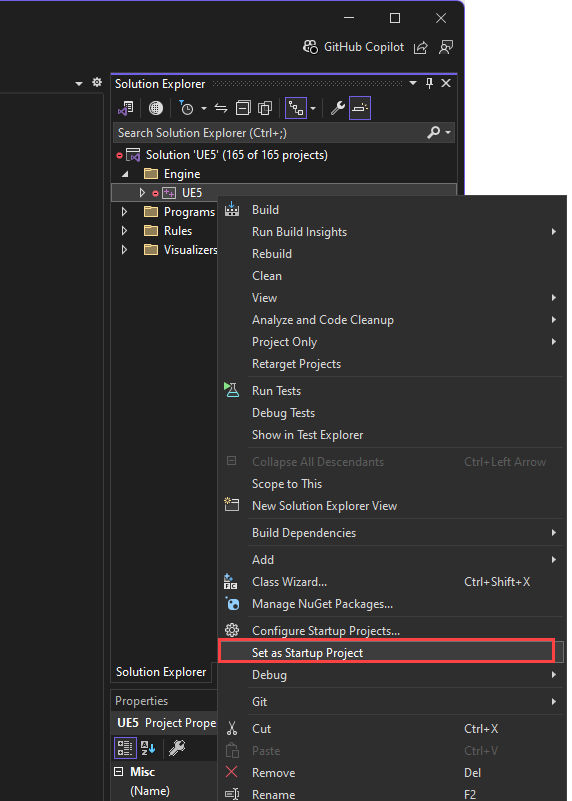
- Set Startup Project:
- Set your startup project by right-clicking the UE5 target and selecting Set as StartUp Project.
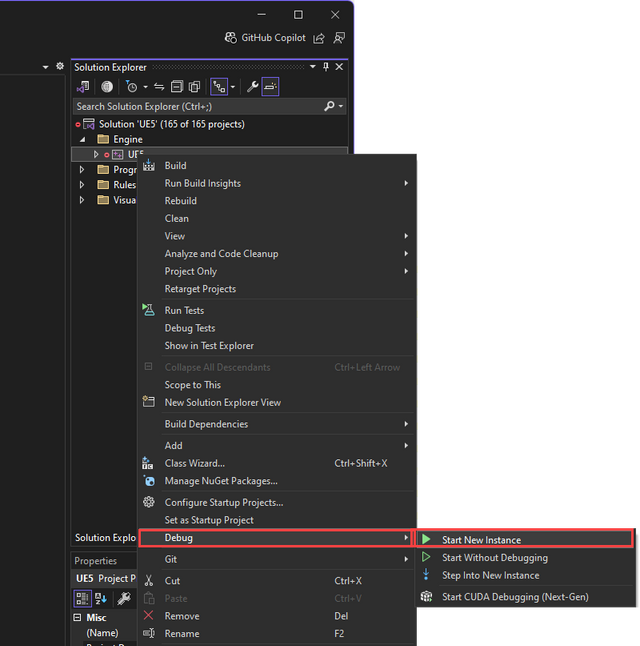
- Launch the editor:
- Right-click the UE5 project, then select Debug > Start New Instance , or press F5 on your keyboard, to launch the Editor
Next Steps
After building Unreal Engine from source and configuring you Android Build tools you can start building applications for the Magic Leap 2. To get started see the following resources:
- Learn how to download the Magic Leap Unreal Example Projects.
- Step-by-step instructions on how to Create a Magic Leap 2 app using Unreal Engine.